VPC Lattice: yet another connectivity option or a game-changer?
12 April 2024 - 4 min. read
Damiano Giorgi
DevOps Engineer


Microservices architecture has now become a leading pattern in many software projects. Thanks to its enormous advantages in terms of development and deployment speed, it eases the daily tasks of DevOps teams.
To leverage this architectural pattern on AWS we can use Amazon Elastic Container Service (Amazon ECS), a fully managed container orchestration service.
ECS is a great choice for container execution for several reasons. First, it allows you to run ECS clusters using AWS Fargate, a serverless infrastructure for containers. Fargate removes the need to provision and manage servers, allowing us to pay only for the resources used for each application.
Additionally, ECS can be natively integrated with other services such as Amazon Route 53, Secrets Manager, AWS Identity and Access Management (IAM), and Amazon CloudWatch.
Managing microservices architectures on ECS is not always an easy matter. On our blog we have already discussed how to create and manage clusters and implement CI / CD pipelines for ECS.
In this article we are going to see a fundamental aspect for the continuous integration of the software, which is the different strategies of releasing new software packages. In particular, we will focus on the blue/green methodology, a relatively new technique that solves many problems of other simpler deployment modes.
To date, there are many deployment strategies. Let's see together the most popular and supported by ECS:

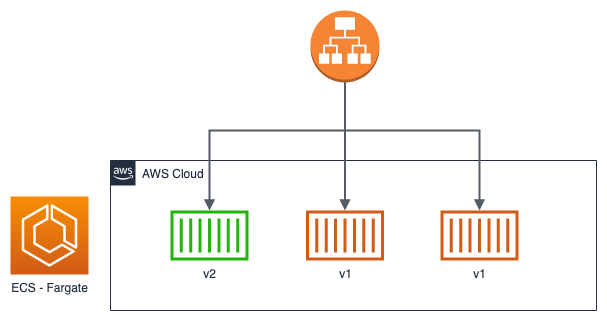
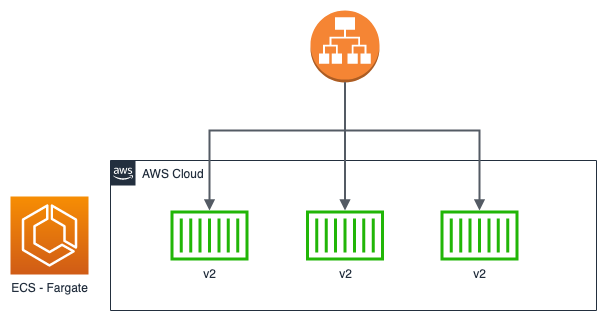
Obviously, it is up to us to decide which type to choose based on our needs. Taking advantage of Cloud Computing, it may be convenient to prefer a blue / green or canary type over a rolling update to avoid downtime and have rapid rollback times if necessary. To date, implementing these new types of deployment is relatively simple and at a very low cost, especially if you use serverless technologies such as ECS in Fargate mode.
The purpose of this how-to is to implement a blue/green deployment strategy on ECS. Before starting, however, you need to meet some requirements:
Let's start by describing the fundamental building block for our microservices architecture: the Docker image. In this step you can use your favorite image, or one you are already working on for your project. In our case, we have created a simple Node.js application to serve a web server (using Express) listening on port 3000 which serves 2 APIs.
const express = require('express')
const app = express()
const port = 3000

app.get('/', (req, res) => res.send('Hello World!'))
app.get('/health', (req, res) => res.send('Health check status: ok'))

app.listen(3000, () => console.log(`Example app listening at http://localhost:${port}`))
As you can see, we have exposed a health check API under route health. If you are using your Docker image, you need to enter this, or another health check route, as it will be a fundamental step in the deployment phase to assess whether our new software version is "healthy" or not.
Like all Node.js applications, the package.json file cannot be missing:
 {
  "name": "ecs-blue-green",
  "version": "1.0.0",
  "description": "",
  "main": "app.js",
  "scripts": {
    "test": "echo \"Error: no test specified\" && exit 1"
  },
  "author": "",
  "license": "ISC",
  "dependencies": {
    "express": "^4.17.1"
  }
}
Our micro-service is ready! We just have to build the Docker image and save it on AWS. For purely demonstrative purposes, we use a very simple Dockerfile (that's right, the more experienced are well aware that we could create a more lightweight image!):
FROM node:10

COPY . .
RUN npm install

EXPOSE 3000
CMD [ "node", "app.js" ]
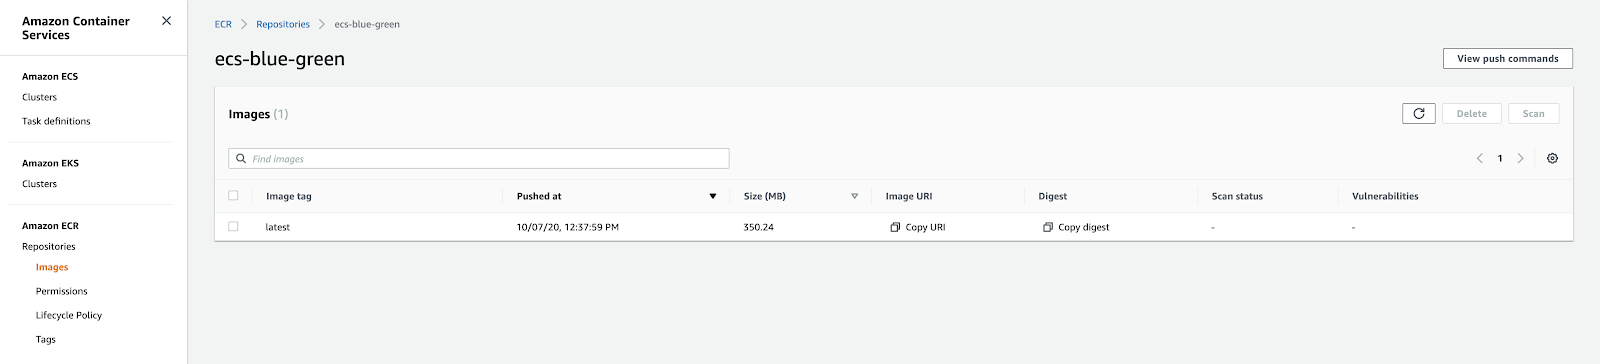
Let’s create a repository on Elastic Container Registry (ECR) to host our Docker images. Through the Console, the operation is very simple. By opening the newly created repository we can access the "View push commands" section to obtain the commands needed to build and push our Docker image on ECS.
When done, you should see this in Console:
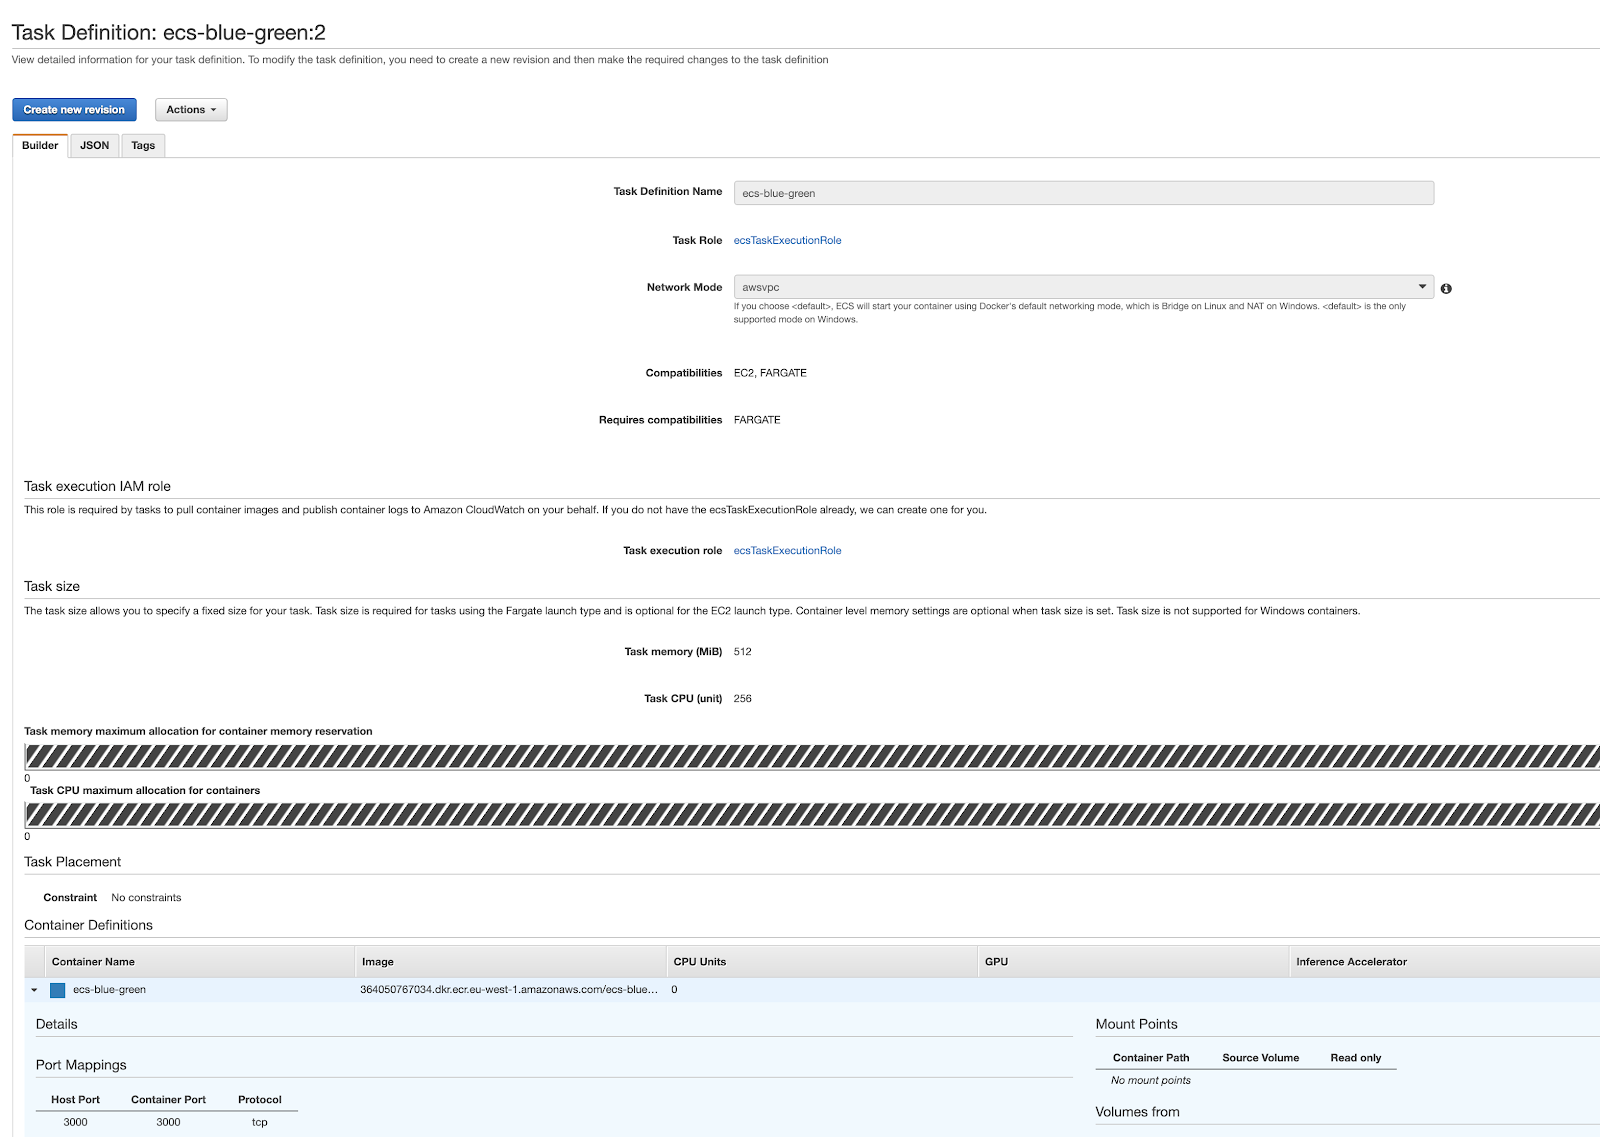
At this point we have to configure the Task Definition, the fundamental computing unit of ECS that will host our Docker containers.
For now we can assign the default roles to both the Task Role and the Task Execution Role since they are sufficient for the operations we have to perform. We then create a container and associate it with the Docker image, previously saved on ECR, appropriately configuring the vCPU and the memory to be reserved. Don't forget to expose port 3000 from the container!
The final result of the newly created Task Definition will be as follows:
Let's conclude this phase with the Service creation.
Proceeding through the Console, on the first page it is necessary to select “blue / green deployment”. Pay attention to this step: if you select "Rolling update" you will need to delete and recreate the Service since the option will no longer be editable:
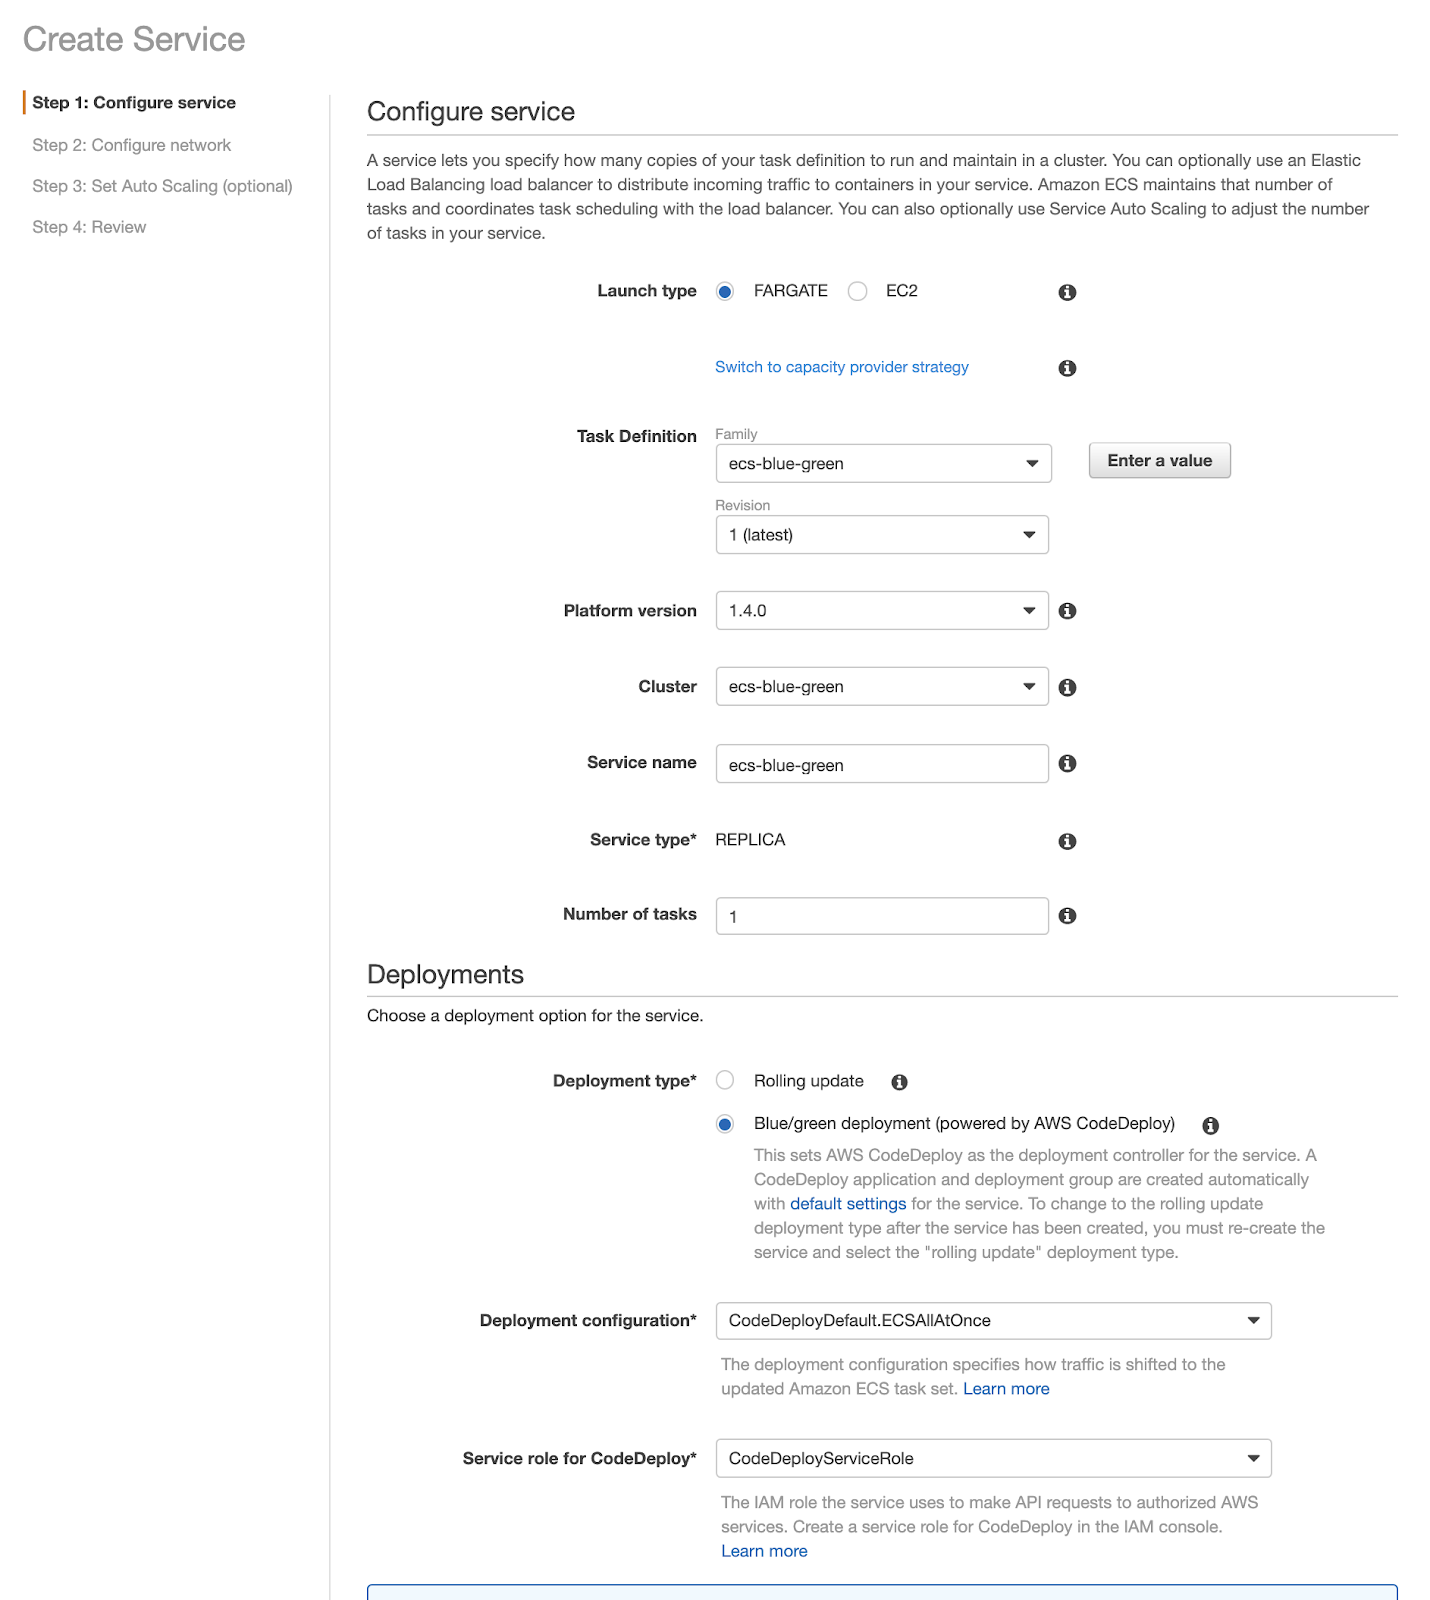
In the following sections, you can enter the data of your VPCs, subnets, and security groups.
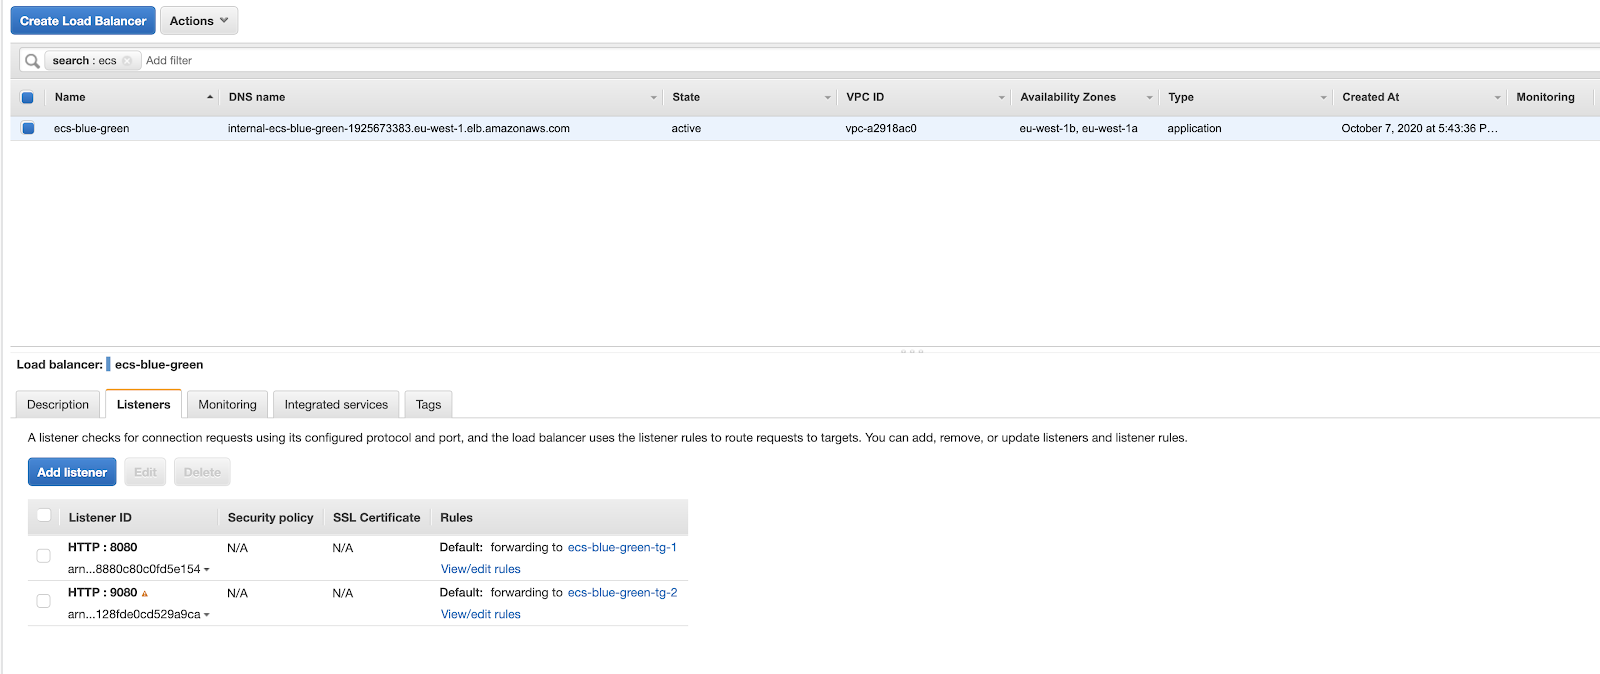
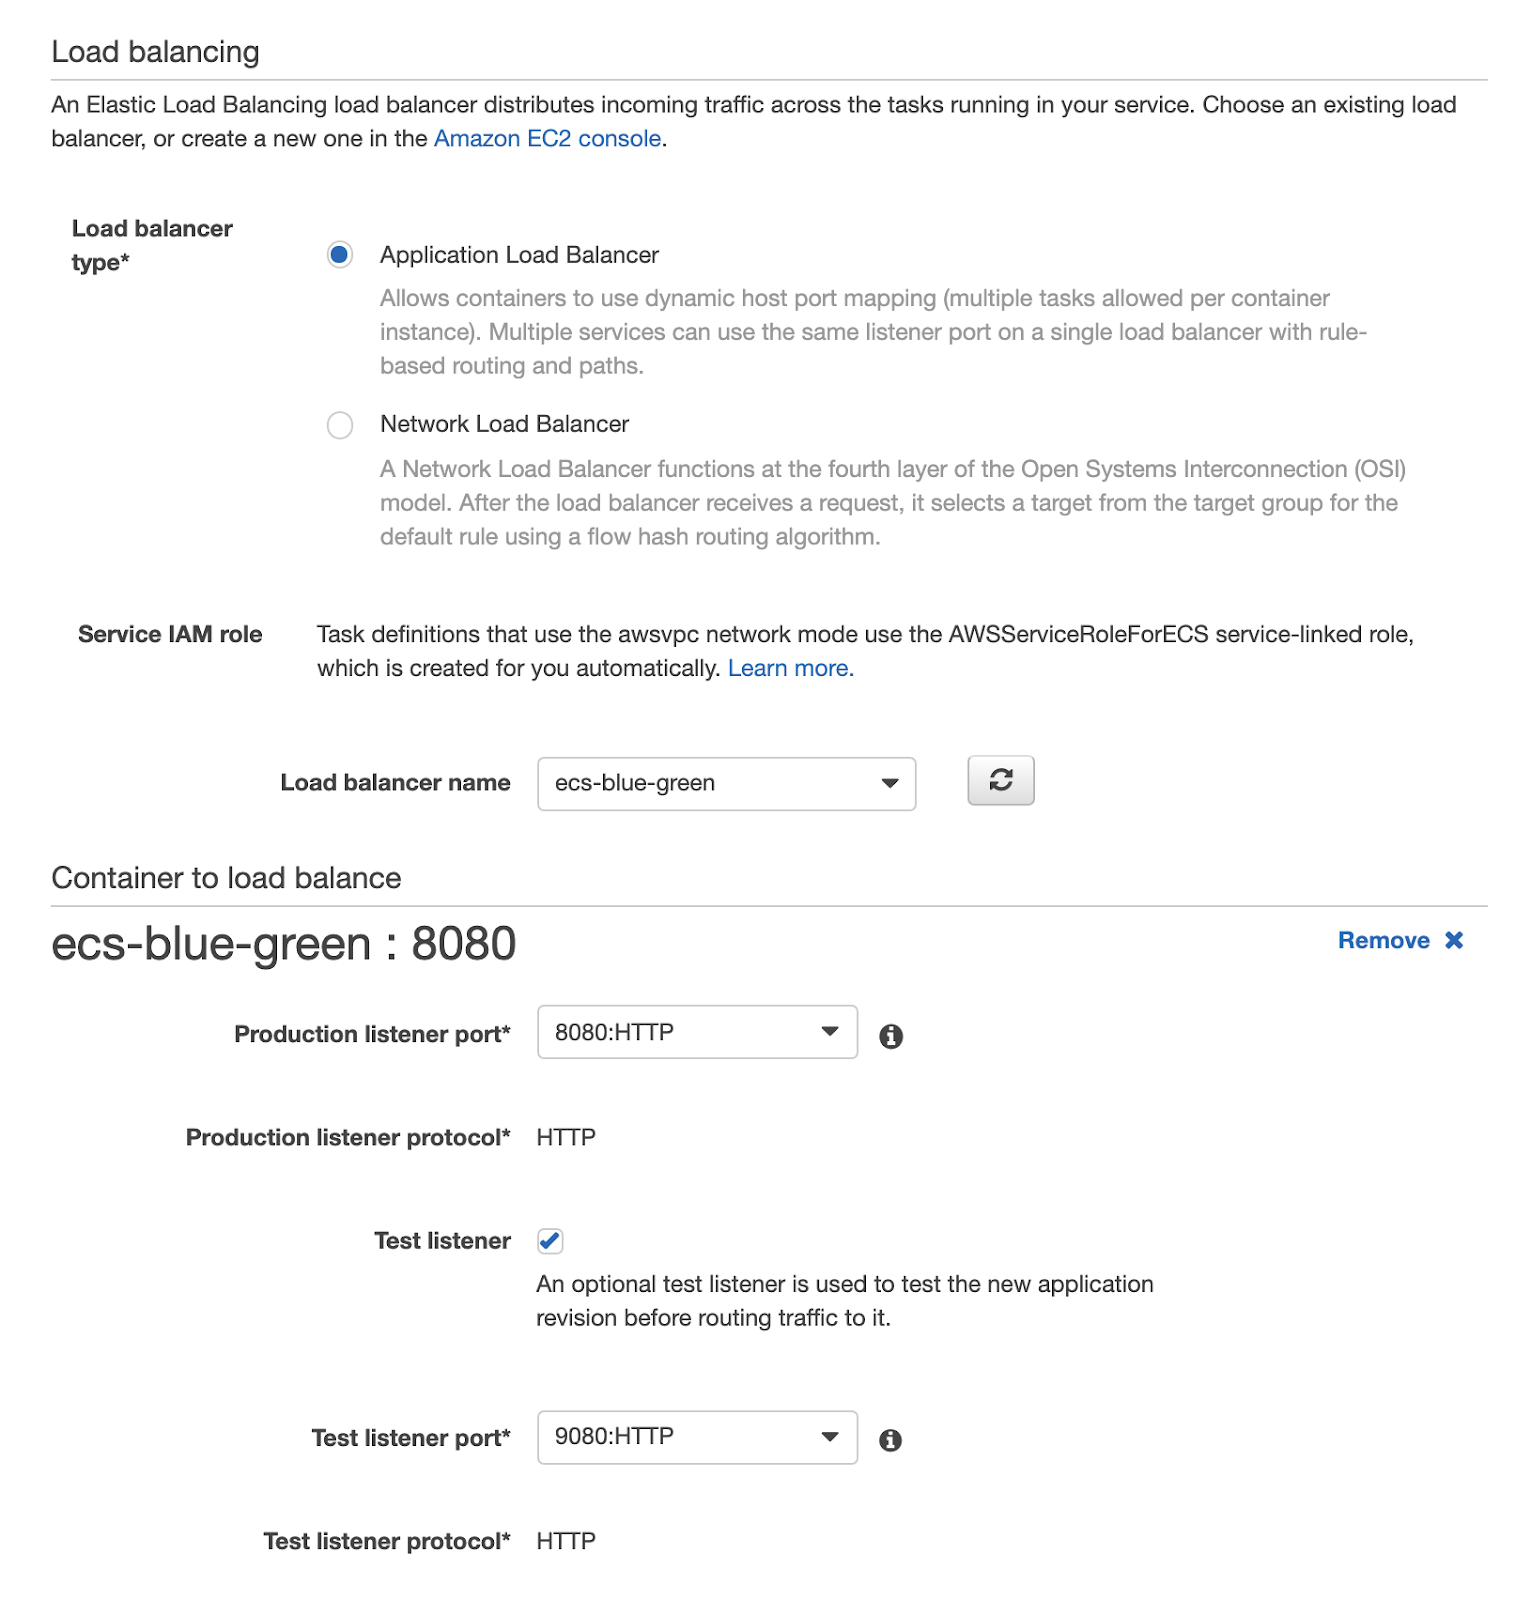
Now it’s time to go back to the Application Load Balancer we discussed during the prerequisites definition. At this point of the walkthrough, we need to properly configure CodeDeploy by providing it with the Application Load Balancer, the Listeners and the Target Groups to be used for the management of the blue / green deployment.
Now we just have to try a deployment!
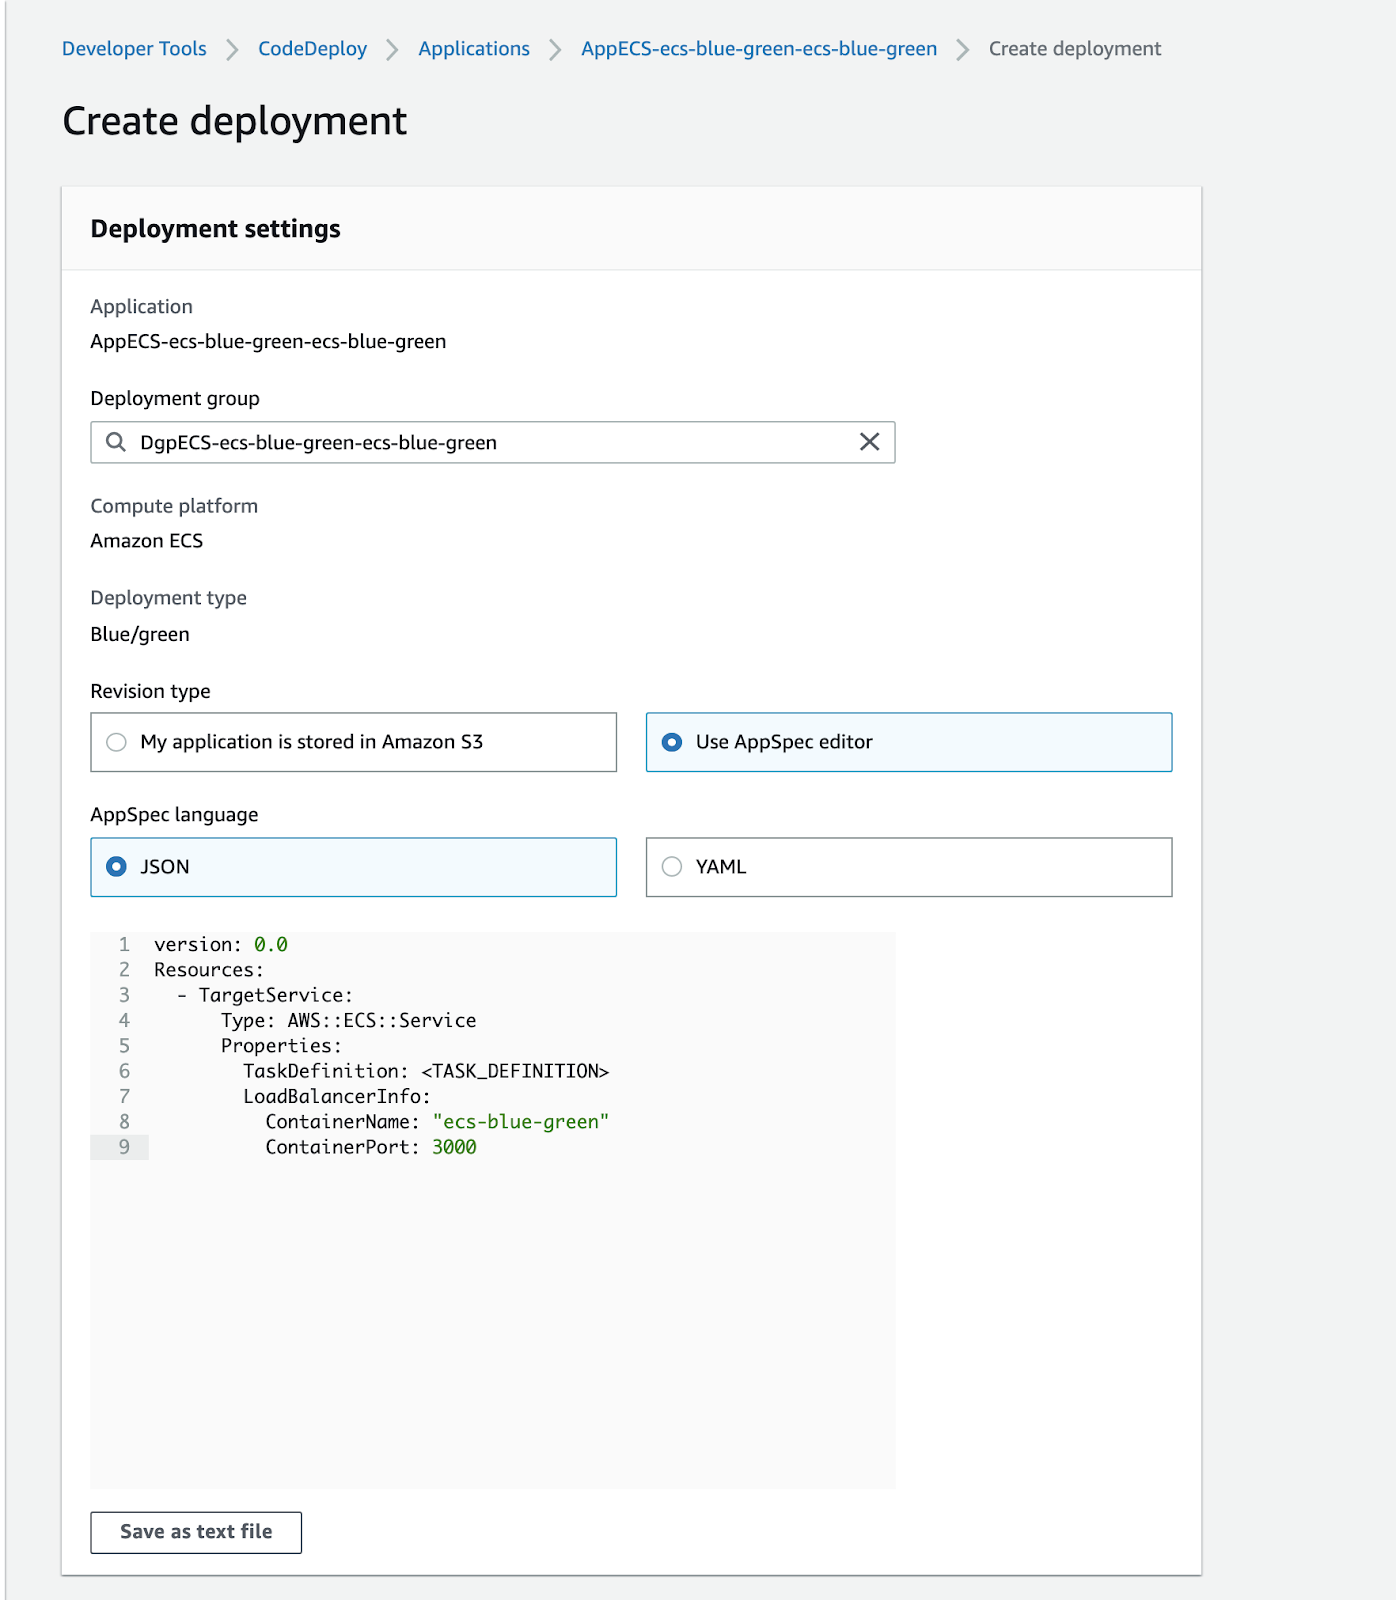
Opening the CodeDeploy page we notice that an Application has been created together with a Deployment Configuration Group. These components have already been configured for us when we created the ECS service. In order to start a deployment, it is necessary to provide a yaml file with a precise syntax, which can be consulted on the AWS documentation.In our case, let's define the ECS Service entry point in the appspec.yaml file together with the version of the task definition to be used:
version: 0.0
Resources:
  - TargetService:
      Type: AWS::ECS::Service
      Properties:
        TaskDefinition:
        LoadBalancerInfo:
          ContainerName: "ecs-blue-green"
          ContainerPort: 3000
Remember to replace
Once the configuration is complete, you’ll land on the deployment page. Here you can monitor its progress. Once the new task is installed, you will see a screen like this:
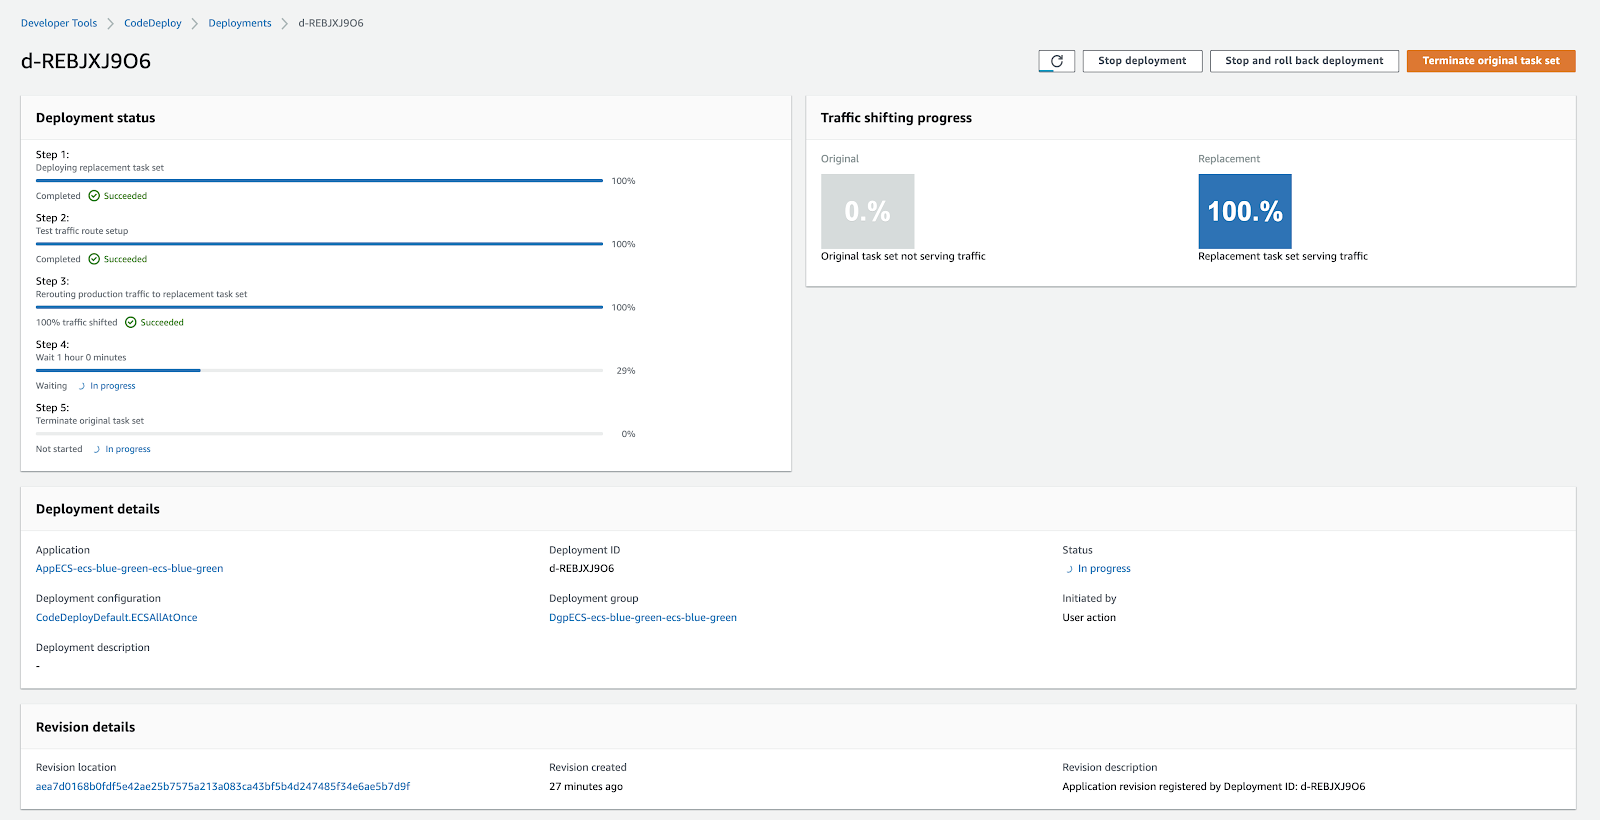
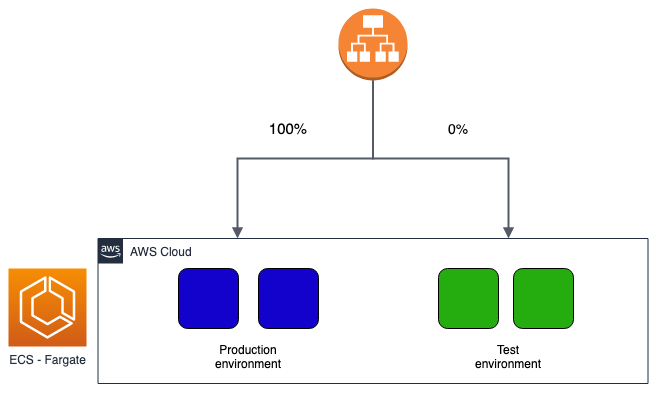
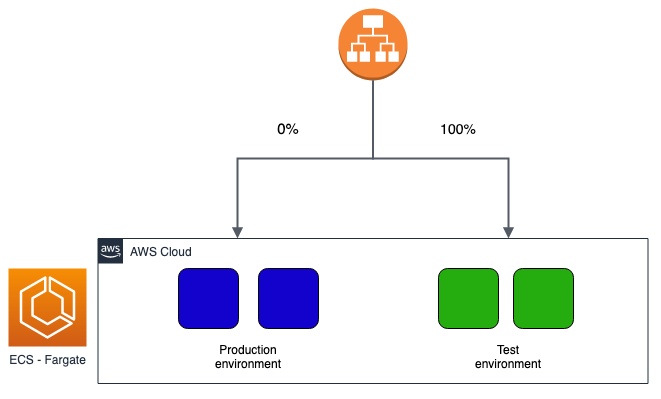
On CodeDeploy you can monitor the progress of your deployment, understand if there is any problem during the installation of the new software package, analyze the amount of traffic on the old and new infrastructure, as well as having the ability to roll back if you deem it appropriate.
At this point, the blue / green deployment is finished and you can decide whether to rollback, if you have noticed any problems on the new application, or directly approve the new software version.
You can also fully rely on your release system without having to manually promote or rollback. In this case, the "blue" infrastructure will be automatically promoted, in case of successful installation, after the time you have configured.
In this article, we have seen how to create an ECS Service able to manage releases in blue/green mode. The presented configuration can be easily replaced by a pipeline triggered directly by our version control system. In short, from a simple git push we can release the new software package in blue/green mode.
Curious to learn how to set up a pipeline to manage the entire release flow? Follow us: we’ll discuss this in a short time in a new article.
#Proud2beCloud meets you in 14 days.
See you at the next deployment!