VPC Lattice: yet another connectivity option or a game-changer?
12 April 2024 - 4 min. read
Damiano Giorgi
DevOps Engineer
AWS DevOpsWith the launch of CodeBuild last November on the stage of re:Invent, AWS added the missing puzzle piece to the suite of software development lifecycle management tools.
We were there, and this was all we had been waiting for to be able to get to work and implement a Continuous Delivery system entirely based on services operated by Amazon Web Services.
Before CodeBuild, AWS’s suite only covered aspects relating to source control (CodeCommit), release management (CodeDeploy) and orchestration (CodePipeline), forcing developers to use third-party tools (for example Jenkins) to manage the build and test phases. Tools that have to be configured and operated manually, with all the issues that this entails in terms of the complexity, costs, and reliability of the solution.
We are thinking about how the Continuous Delivery stack is, on the one hand, critical (an incident with one of these tools can compromise hours or days of a whole development team’s work), but on the other hand, it represents — especially for small, agile DevOps teams — an object which is foreign to the “core” activities which should have the least effort focused on it possible; a sort of black box that just needs to work.
A Continuous Delivery stack must:
For AWS users, the use of a CD stack which is entirely based on its managed services is the most natural and immediate option that meets all these requirements.
The SolutionLet’s briefly review which tools we have available to us:
Our team has developed a comprehensive and automated solution for managing the software lifecycle on Amazon Web Services, applicable both to hybrid environments (in this case, integration with the repository and build is done in the Cloud, whereas the deploy can take place on any type of instance, both in the Cloud or on-premise), and to fully Cloud-based environments, with the staging and production machines which are also in the Cloud.
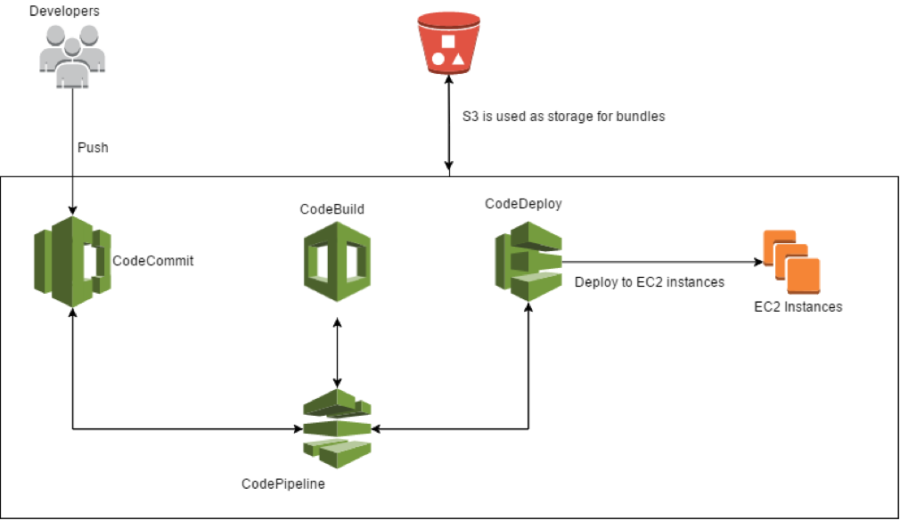
[caption id="attachment_483" align="aligncenter" width="900"] The developers push the code on CodeCommit, a trigger is set off, and CodePipeline takes the code and feeds it into CodeBuild, which carries out the build and the tests and creates the artifact, ready for the deploy. At this point, CodePipeline passes the packet to CodeDeploy which releases it on a pool of EC2 instances. At every step, S3 is used as supporting storage for the artifacts.[/caption]Using only AWS services, which are compatible and specifically designed to cooperate with each other, has the advantage of putting specific triggers and extremely simplified setups at our disposal. Everything scales automatically and without the need for any particular technical operations; the team is, therefore relieved of the burden of sizing the Continuous Delivery infrastructure in advance.
It is also possible to manage security and permissions at a granular level by using IAM role and IAM policy. Unlike what happens when using other tools, it is possible to remain confined within the sandbox of a single Amazon account, without having to externally present an endpoint to start the build process.
We have found that CodeBuild takes care of the build and test phases by using provisioning of the containers; these start up only when needed, thus optimising performance and eliminating the need for dedicated instances, as happens when using Jenkins, for example.
Another key feature of CodeBuild is isolation, which allows for each build to be segregated at both the application and release levels.
AWS CostsBefore we begin with the tutorial, let’s have a look at the AWS costs incurred by this solution:
The price of each CodePipeline pipeline is $1/month, whilst for the first 5 users (50GB and 10000 git requests), the CodeCommit service is totally free. For the sixth user onwards, the cost is $1/month per user.
The cost of the CodeBuild service is calculated according to the minutes of the actual use of the containers carried out by the builds, a model that allows for significant cost savings compared to traditional runners based on EC2 instances, which are charged on an hourly basis.
CodeDeploy is free, with no limits on traffic or time.
The additional costs to be considered are the storage and bandwidth costs generated by S3, which is used as supporting storage for the artifacts between one step and the next of each pipeline.
Obviously, costs can vary widely depending on the context and organisation of every team, but we would like to say that in most cases, this stack works out to be one of the cheapest solutions around.
Now let us enter into the heart of the implementation.
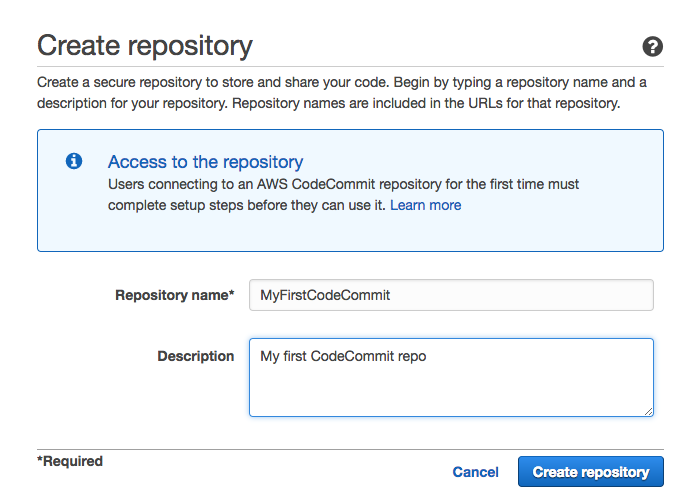
CodeCommitThe first service to be configured is CodeCommit.
We create the repository by logging into the AWS console or, in the case of programming access, to the CLI.
 Now we create an IAM user that will allow us to proceed with the main git actions on the repository that has just been created.
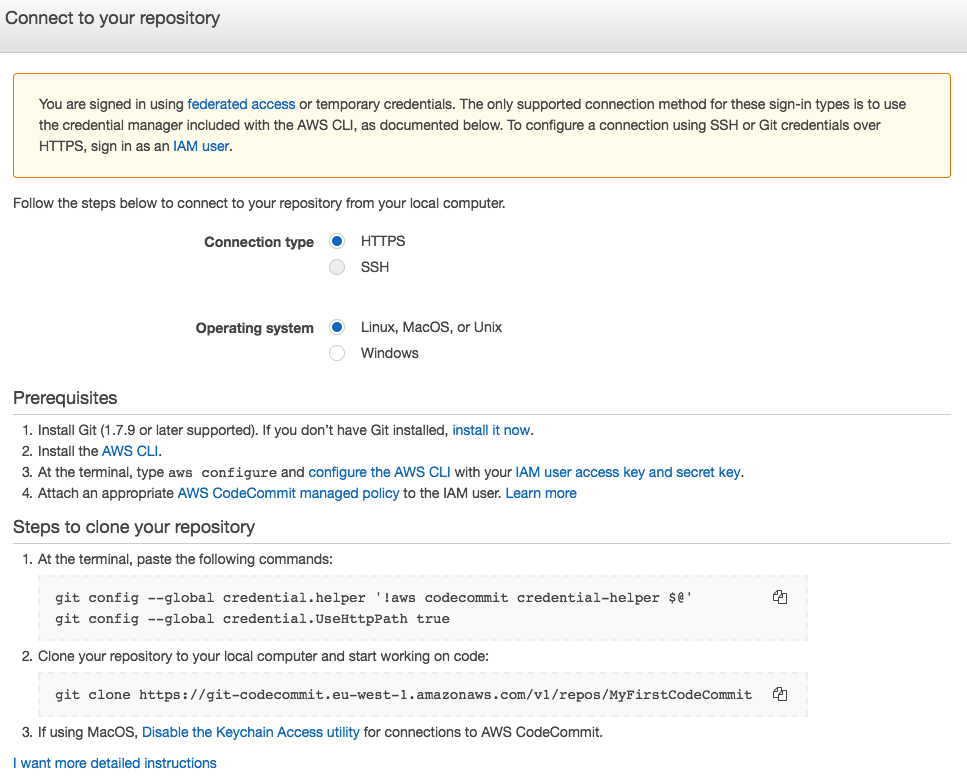 To get the necessary permissions to access the repo, you must authenticate as an IAM user. Here are the possible methods:
With each push of the app’s source code, this is taken over by CodeBuild, which deals with the provisioning of a temporary, isolated environment (container) inside which the build and test phases will take place.
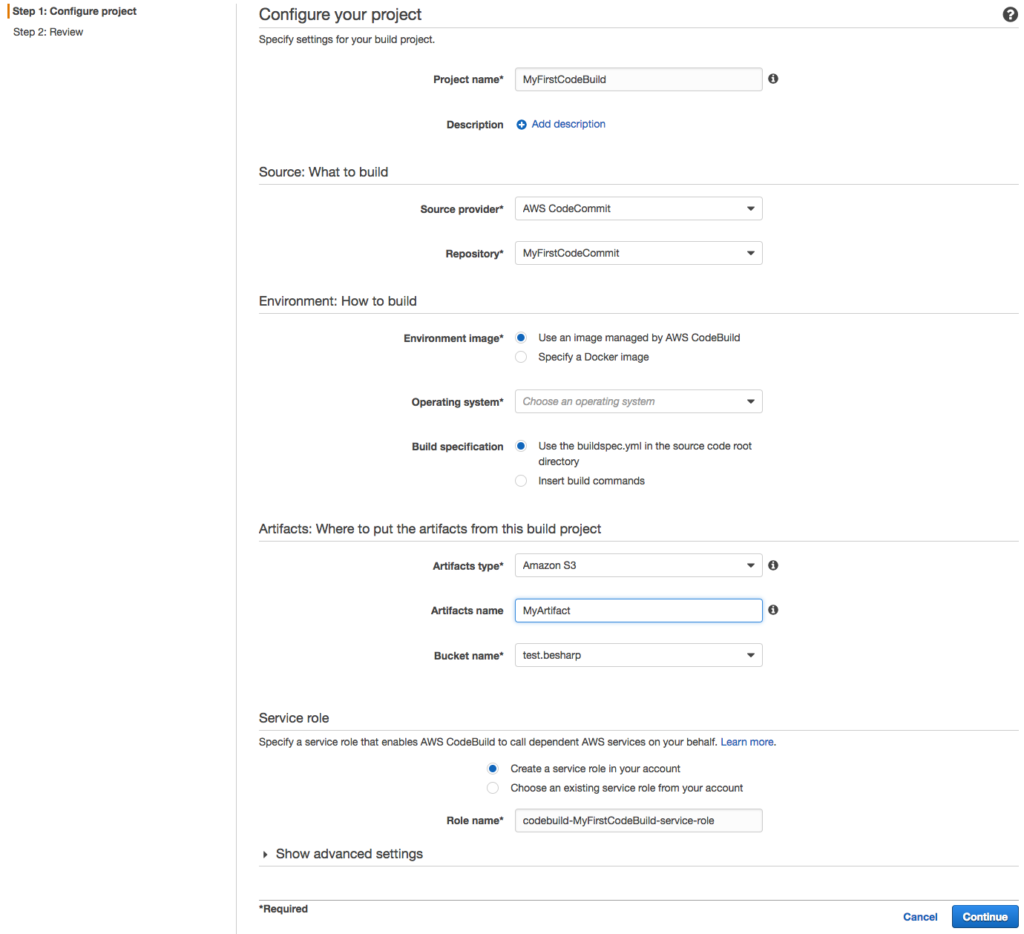
CodeBuildBefore proceeding to the test and build phases, we must configure CodeBuild, specifying the container size, the type of image desired (for example, a Linux container with a preinstalled framework from the ones available or a custom image) and specifying the steps we want CodeBuild to take to carry out the test and build of the app. This last step means a choice between two methodologies: declaring the inline commands or using a file called buildspec.yml that will invoke the hooks of the build cycle.
We chose to use the latter method because, in this way, the YAML buildspec file can be versioned along with the application code, giving us the opportunity to change the test and build procedures just before the build phase itself.
So, within each hook, we have specified the commands that CodeBuild will perform, moment by moment.
Below is a generic example of the structure of a buildspec.yml file located in the root directory of the repository:
version: 0.1

environment_variables:
plaintext:
JAVA_HOME: "/usr/lib/jvm/java-8-openjdk-amd64"

phases:
install:
commands:
- apt-get update -y
- apt-get install -y maven
pre_build:
commands:
- echo Nothing to do in the pre_build phase...
build:
commands:
- echo Build started on `date`
- mvn install
post_build:
commands:
- echo Build completed on `date`
artifacts:
files:
- target/messageUtil-1.0.jar
discard-paths: yes
Since the last phase of the buildspec.yml, we made sure to get a bundle that was compatible with CodeDeploy, the service used in the next phase; the package obtained from the last build phase contains both the application, ready for implementation, and the scripts to run to install it and configure it on the deploy instance.
CodeDeployFor CodeDeploy to function, its scripts must be executed from within the instance; for this to happen, the AWS CLI and the CodeDeploy agent must be installed in each instance of the process’ target infrastructure.
We create a file containing the declaration of the hooks, this time called appspec.yml. After having created the necessary scripts from scratch, we decided which and how many of them to call for each hook.
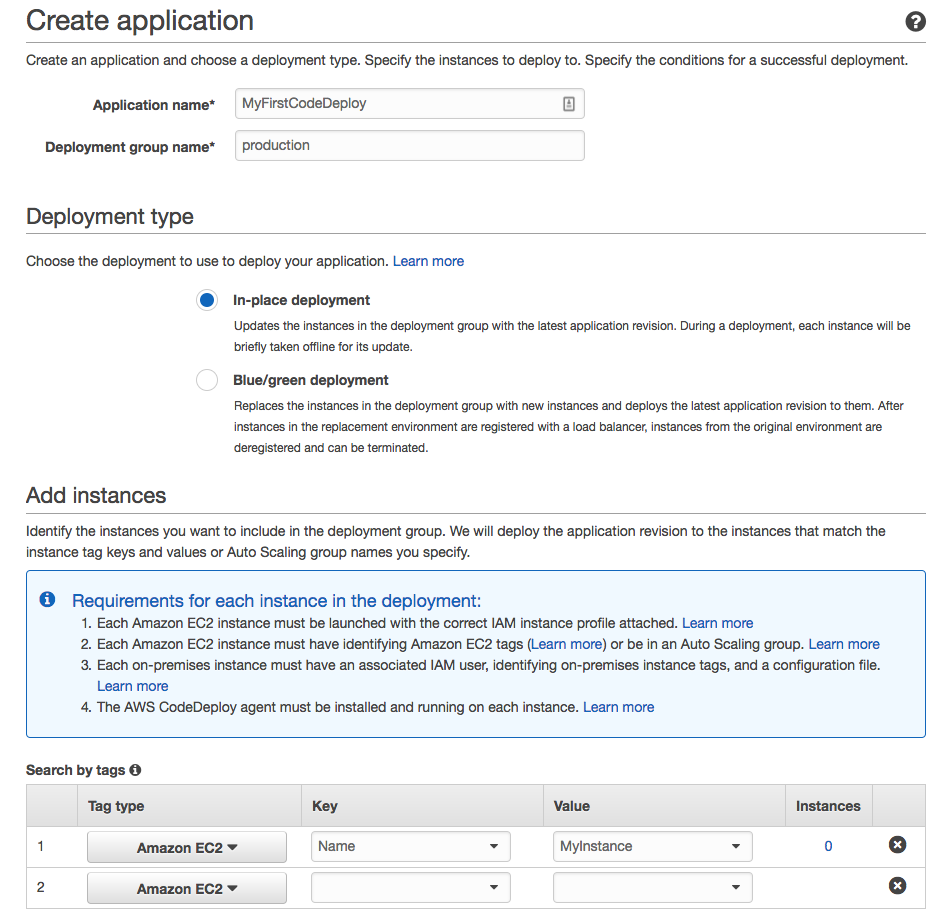
The YAML appspec file, in this specific case, requires two folders to be created in the bundle: one (App) dedicated to the application and another (Scripts) dedicated to the scripts.
Below is a generic example of the structure of an appspec.yml file located in the root directory of the bundle:
version: 0.0
os: linux
files:
- source: App/
destination: /var/www/html/
- source: nginx.conf
destination: /etc/nginx/
hooks:
BeforeInstall:
- location: Scripts/UnzipResourceBundle.sh
timeout: 300
runas: root
- location: Scripts/InstallDependencies.sh
timeout: 300
runas: ubuntu
AfterInstall:
- location: Scripts/FixPermissions.sh
timeout: 300
runas: root
ApplicationStart:
- location: Scripts/WebServerStart.sh
timeout: 300
runas: root
ValidateService:
- location: Scripts/ValidateService.sh
timeout: 300
runas: ubuntu
CodePipelineWorking in parallel with the three tools that we have just described is CodePipeline, the service orchestrator that deals with passing the outputs generated by each phase to the next service, which will use them as the inputs needed to perform its task. Each phase of the Continuous Integration process uses the S3 platform as supporting storage.
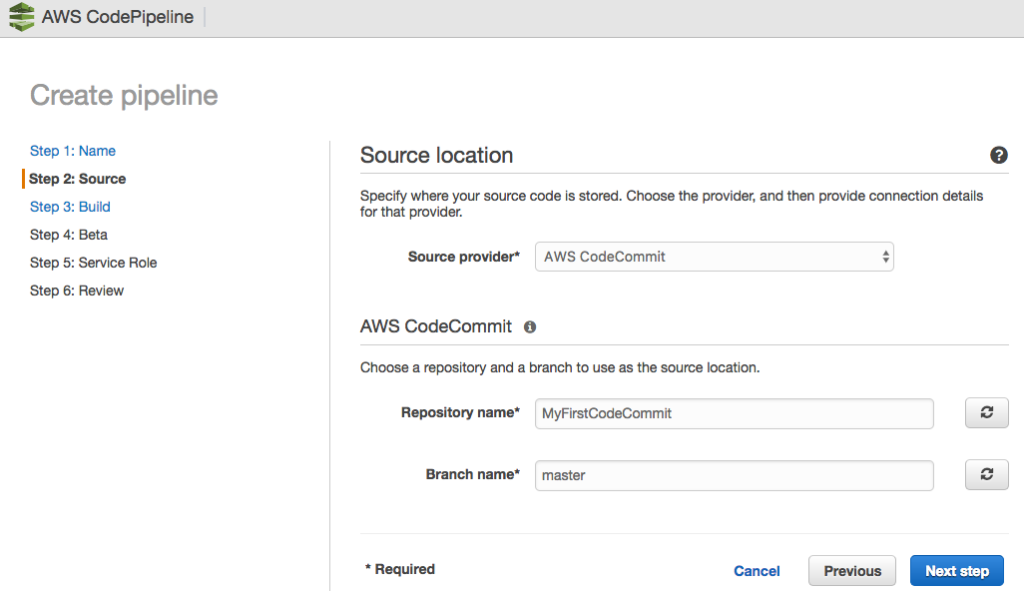
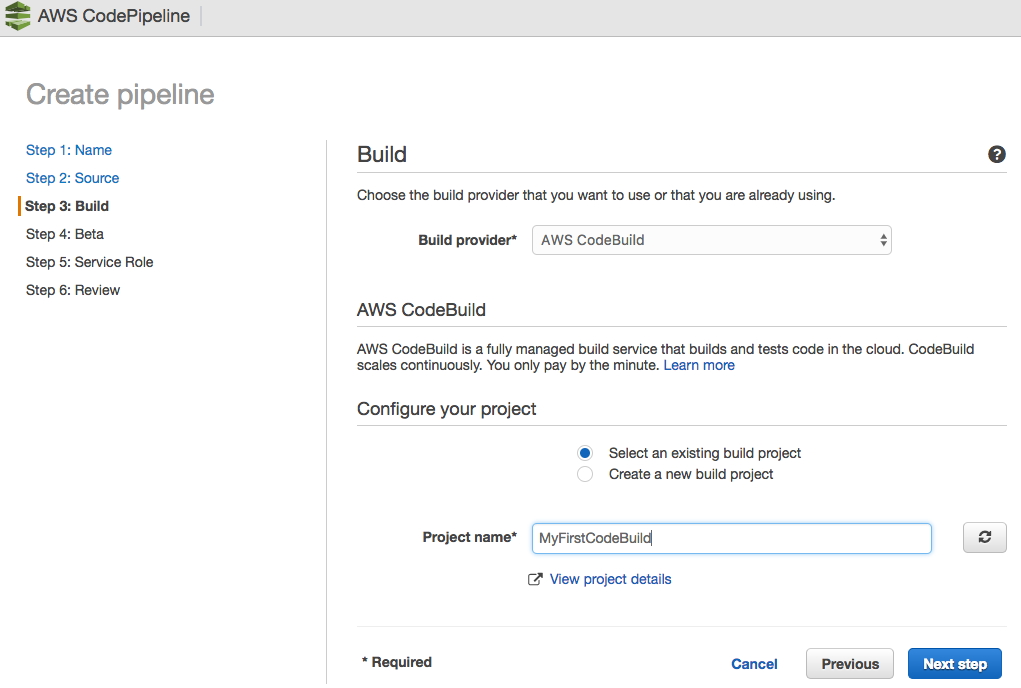
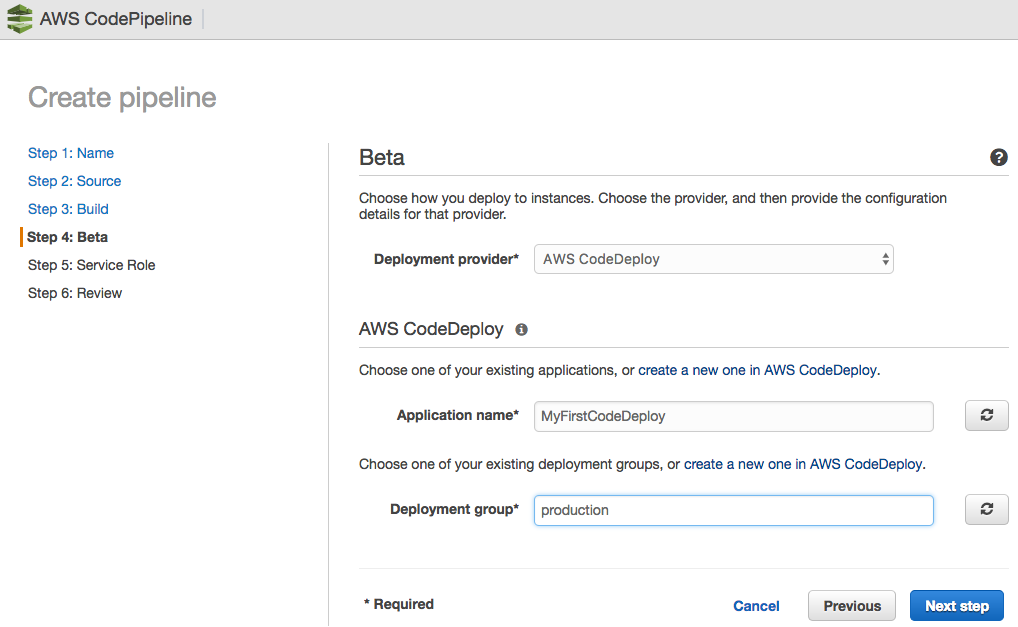
For CodePipeline to function, you need to create a pipeline; to do this, we access the AWS console and perform the following steps:
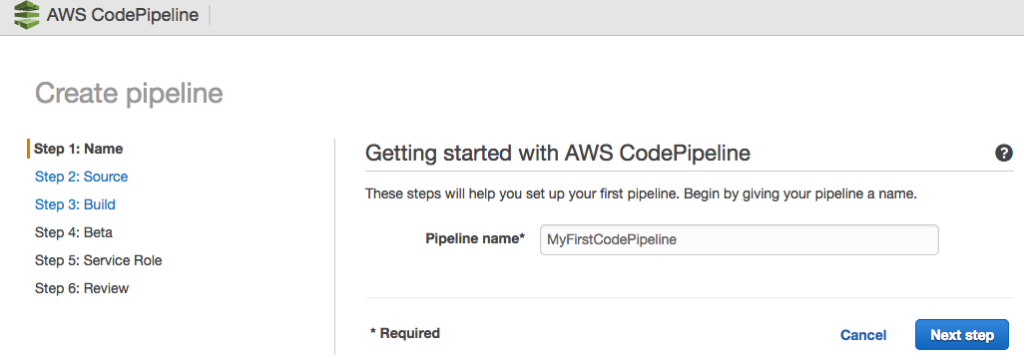
 The Pipeline has been successfully created.
When CodeCommit is linked to CodePipeline, it automatically creates a trigger that means that every git push causes the process described in the pipeline created to initiate.
The source code that results from this phase is delivered in the form of an input to CodeBuild, which generates a bundle that will, in turn, be the input for CodeDeploy. CodeDeploy will then install the app on the target infrastructure.
N.B. it is important to verify that the code generated at the end of each phase by each tool is correct; as each result is the starting point for the next phase, if an output were to be wrong, the whole deploy process would be compromised.
We have been using this solution for the past few weeks now, and we are delighted indeed with it: we deleted all the management efforts of our previous Continuous Delivery infrastructure, increasing the number of builds that we can manage in parallel, and we are also spending significantly less. This stack has turned out to be excellent in terms of efficiency, reliability, and cost efficiency.
What do you think of it?
If our solution has intrigued you and you like the idea of implementing it in your workflow, leave us a comment or contact us! We’d be happy to answer all your questions, read your thoughts, and help you get the most out of this application.