
VPC Lattice: yet another connectivity option or a game-changer?
12 April 2024 - 4 min. read
Damiano Giorgi
DevOps Engineer


"If you gaze into the abyss, the abyss gazes also into you" (F. Nietzsche).
In our previous article about ELB tricks and tips, with a particular focus on Application Load Balancers and Network Load Balancers. Today, we are focusing specifically on Gateway Load Balancers to see how they can help to observe and filter outbound network traffic using appliances.
In this scenario, we assume that we already have designed and implemented a centralized networking solution using a Transit Gateway, as described here.
If you want to add your customized IDS or network filtering solution, you can configure routing tables to forward traffic to an ENI interface of an EC2 instance, but this solution is not highly available and scalable.
Gateway Load Balancers satisfy this need, offering a way to route Layer 3 traffic transparently to inline highly available EC2 instances, regardless of the protocol/port used. If you use other load balancers, you are bound to listeners on a specified protocol/port; for example, you can't forward ICMP traffic.
There are already a lot of pre-configured vendors that already have compatible appliances, like Cisco, F5, and Fortinet. Here you can find the complete list.
In this article, we'll see how to create a simple custom transparent IDS/router appliance that you can adapt to your needs. We will use Linux, iptables, and Suricata; building your custom appliance will also help you to understand what's behind the scenes of pre-built solutions.
Before diving into the building phase, we will briefly describe how this solution works.
As we said, Gateway Load Balancers (GWLB) route all types of IP traffic (TCP, UDP, ICMP, GRE); the technology that makes this possible is the GENEVE protocol.
GENEVE is a new encapsulation protocol defined in RFC 8926, a standard for different systems and vendors. Its acronym stands for Generic Network Virtualization Encapsulation. It encapsulates all traffic sending it in a virtual tunnel so that the underlying network is unaware of what's inside.
This technology is used, for example, to extend and transport VLANS (or even VXLANs) across the Internet between different networks.
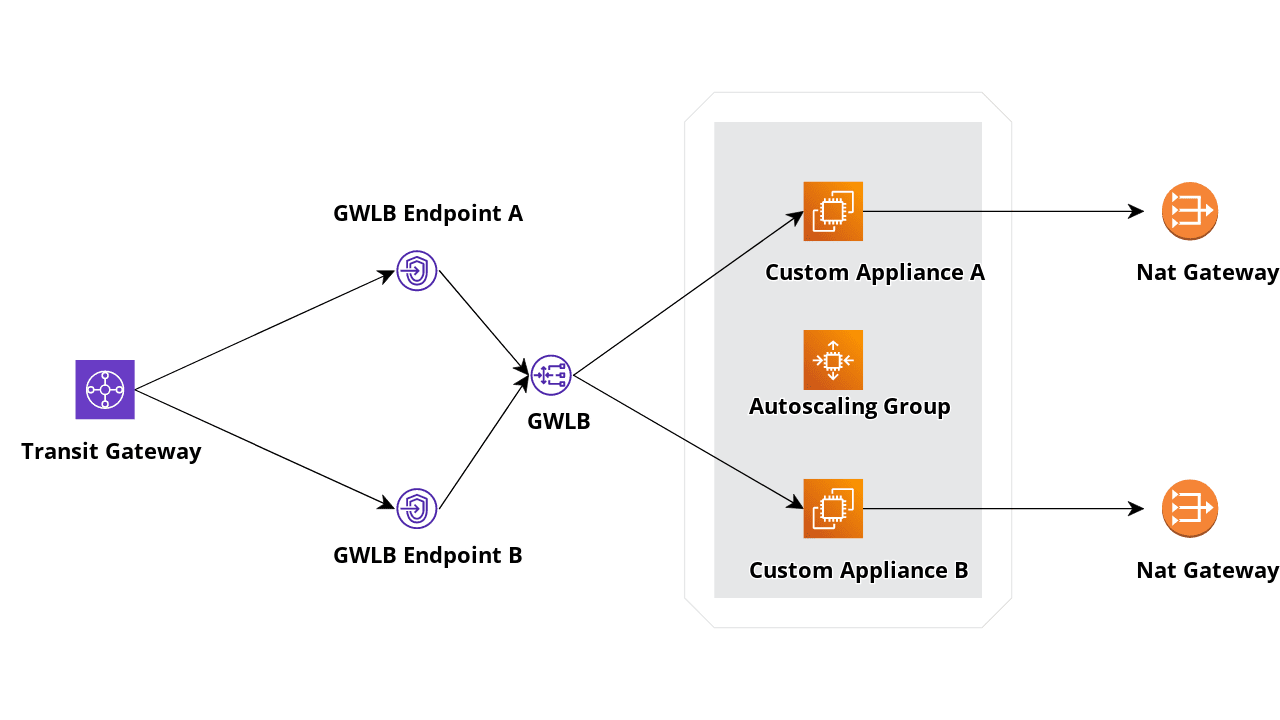
We want our setup to be fault tolerant and scalable. Like Application and Network Load Balancers, our Gateway Load Balancer can span multiple Availability Zones. We'll also deploy our appliances using an Autoscaling Group so that we can add elasticity to our solution.
As shown in the figure below, we use NAT Gateways to simplify public IP management: some third-party external services can require a fixed set of source addresses. A Nat Gateway will ensure that, if the autoscaling adds an appliance in an availability zone, it still will use the same Elastic IP to access the Internet.
Let's move on and start with some command-line and AWS Console sessions!
Before deploying our load balancer, we will need to create an AMI using Ubuntu 22.04; you can customize it later for your needs.
An EC2 instance can be used as a target for a GWLB if it can establish a GENEVE tunnel with it. Once the GENEVE tunnel is established, traffic can flow to it, and our Gateway Load Balancer will start distributing traffic.
For this reason, the first thing we need to do is to support a GENEVE tunnel on our custom appliance. Lucky for us, AWS already gives us a tool to ease our task (You can also use the
ipLinux standard networking command to handle tunnel creation).
We will skip describing the instance creation and start with the tunnel handler compilation and installation. In this phase, we'll install Suricata, an open-source network Intrusion Detection System, using the default configuration and updating its rules.
apt update
apt install -y build-essential "Development Tools"
apt install -y cmake g++ suricata
snap install aws-cli --classic
suricata-update #update rules for suricata
cd /opt
git clone https://github.com/aws-samples/aws-gateway-load-balancer-tunnel-handler
cd aws-gateway-load-balancer-tunnel-handler
cmake .
make
Our tunnel handler is ready. You will find an executable "gwlbtun" in the current directory; if you invoke it specifying the "-h" parameter, you should be able to see the help page.
root@ip-10-101-5-238:/opt/aws-gateway-load-balancer-tunnel-handler# ./gwlbtun -h
AWS Gateway Load Balancer Tunnel Handler
Usage: ./gwlbtun [options]
Example: ./gwlbtun

 -h         Print this help
 -c FILE    Command to execute when a new tunnel has been built. See below for arguments passed.
 -r FILE    Command to execute when a tunnel times out and is about to be destroyed. See below for arguments passed.
 -t TIME    Minimum time in seconds between last packet seen and to consider the tunnel timed out. Set to 0 (the default) to never time out tunnels.
            Note the actual time between last packet and the destroy call may be longer than this time.
 -p PORT    Listen to TCP port PORT and provide a health status report on it.
 -s         Only return simple health check status (only the HTTP response code), instead of detailed statistics.
 -d         Enable debugging output.
 -x         Enable dumping the hex payload of packets being processed.

---------------------------------------------------------------------------------------------------------
Tunnel command arguments:
The commands will be called with the following arguments:
1: The string 'CREATE' or 'DESTROY', depending on which operation is occurring.
2: The interface name of the ingress interface (gwi-<X>).
3: The interface name of the egress interface (gwo-<X>).  Packets can be sent out via in the ingress
  as well, but having two different interfaces makes routing and iptables easier.
4: The GWLBE ENI ID in base 16 (e.g. '2b8ee1d4db0c51c4') associated with this tunnel.

The <X> in the interface name is replaced with the base 60 encoded ENI ID (to fit inside the 15 character
device name limit).
Gwlbtun's task is to establish the GENEVE connection with our GWLB; it also gives you the ability to specify a health check port that the target group will use, so you don't have to use custom logic to implement one.
Additionally, it can run a script once the session is created or destroyed. We'll take advantage of this and write a simple bash script that enables NAT (using iptables) and IP forwarding. Stopping the service will remove them.
Note: our instance will also need to disable a security feature called "source/destination check". This security feature blocks all traffic not originated or directed from or to the current instance as source or destination. As you'll see, we need to add a role that enables the instance to set this flag by itself.
Place the following script in the
/opt/aws-gateway-load-balancer-tunnel-handlerdirectory and name it
tunnel-handler.sh#!/bin/bash
# Note: This requires this instance to have Source/Dest check disabled; we need to assign a role to the ec2 instance to enable and disable it
echo "Running tunnel handler script... "
echo Mode is $1, In Int is $2, Out Int is $3, ENI is $4
iptables -F
iptables -t nat -F
INSTANCE_ID=$(curl 169.254.169.254/latest/meta-data/instance-id
case $1 in
CREATE)
echo "Disabling source and destination check."
aws ec2 modify-instance-attribute --instance-id=$INSTANCE_ID --source-dest-check
echo "Setting up NAT and IP FORWARD"
iptables -t nat -A POSTROUTING -o eth0 -j MASQUERADE
iptables -A FORWARD -i $2 -o $2 -j ACCEPT
echo 1 > /proc/sys/net/ipv4/ip_forward
echo 0 > /proc/sys/net/ipv4/conf/all/rp_filter
echo 0 > /proc/sys/net/ipv4/conf/$2/rp_filter
;;
DESTROY)
echo "Enabling source and destination check."
aws ec2 modify-instance-attribute --instance-id=$INSTANCE_ID --no-source-dest-check
echo "Removing IP FORWARD"
echo 0 > /proc/sys/net/ipv4/ip_forward
echo 1 > /proc/sys/net/ipv4/conf/all/rp_filter
echo 1 > /proc/sys/net/ipv4/conf/$2/rp_filter
;;
*)
echo "invalid action."
exit 1
;;
esacWe now need to write a systemd unit that starts the handler, place it in
/lib/systemd/systemand give it a name. We will use aws-gwlb.service
[Unit]
Description=AWS GWLB Tunnel Handler
After=network.target

[Service]
ExecStart=/opt/aws-gateway-load-balancer-tunnel-handler/gwlbtun -c /opt/aws-gateway-load-balancer-tunnel-handler/tunnel-handler.sh -r /opt/aws-gateway-load-balancer-tunnel-handler/tunnel-handler.sh -p 80
Restart=always
RestartSec=5s

[Install]
WantedBy=multi-user.target
Alias=aws-gwlb
Issue these commands to reload the configuration and enable the service. As this is only a template instance we don't need to start it now.
systemctl daemon-reload
systemctl enable aws-gwlb
You can now create an AMI and start with the Gateway Load balancer Creation.
First, create a Target Group, click on "Target Groups", and create a new one.
Select "Instances" for the target type, give it a name, and select "GENEVE" as protocol. We will use port 80 as health check target because we told our tunnel handler to use that port (the "-p 80" command line switch").
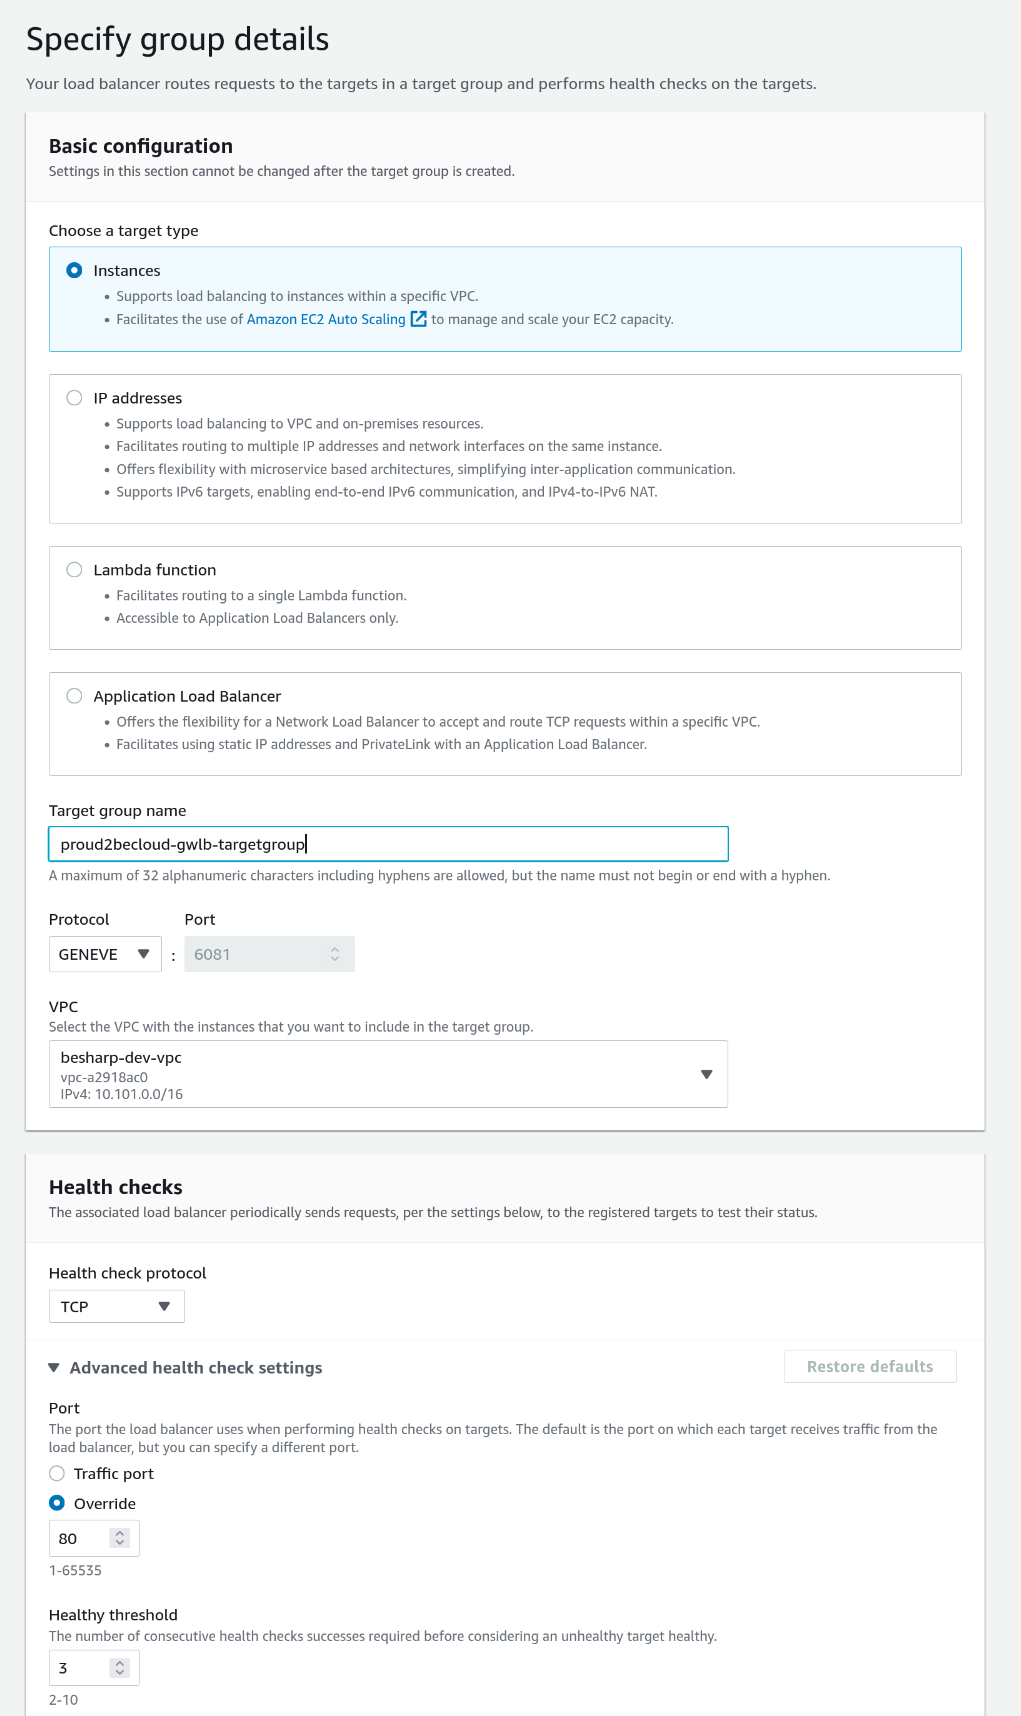
We will not select any instance in the next step since we'll use an Autoscaling Group.
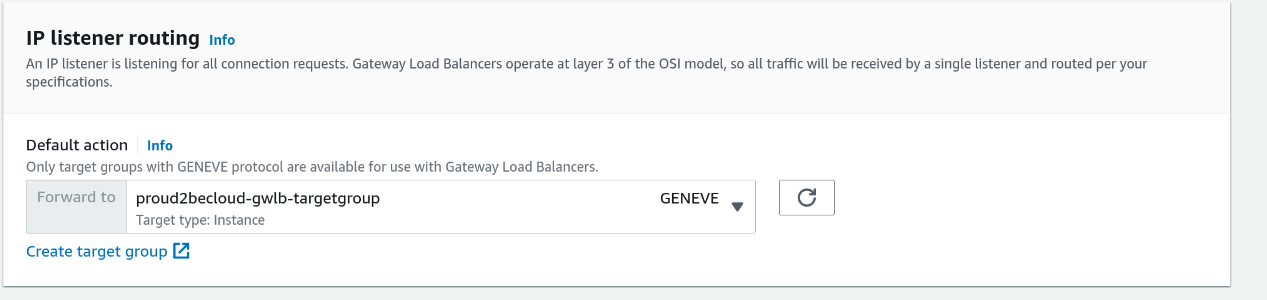
Once the Target Group creation is completed, click on "Load Balancers", add a new load balancer and Select "Gateway Load Balancer".
The basic configuration is shared with the other load balancer types: you need to assign a name and select a VPC and its associated subnets.
You'll find the target group we created in the "IP listener routing" section.
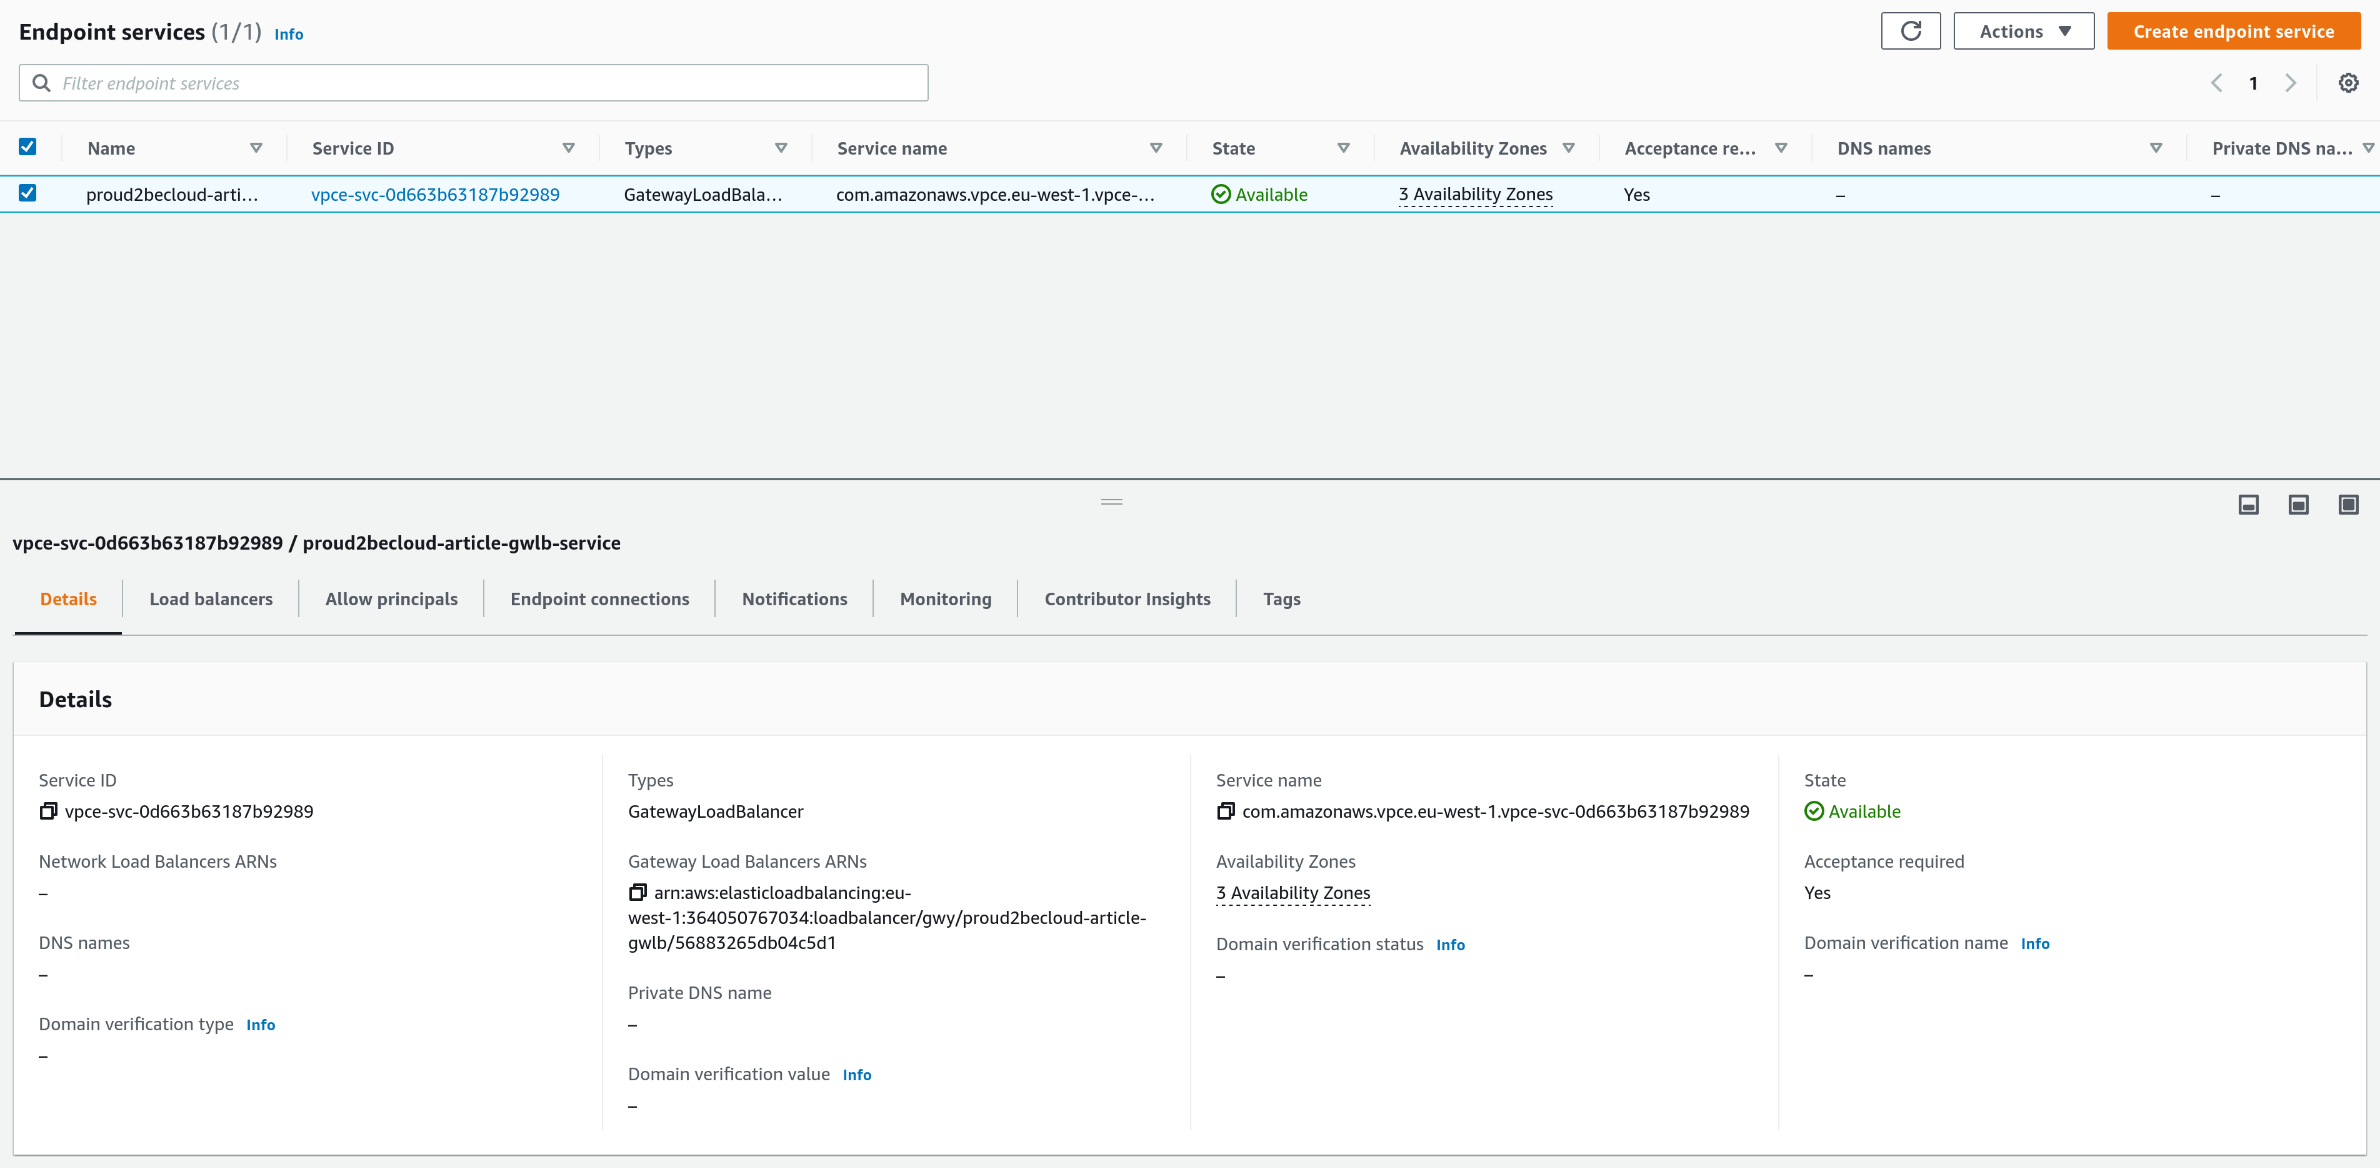
Once the Load Balancer creation finishes, define an endpoint service to use it. On the AWS console, click on VPC and go in the "Endpoint Services" section. The process is the same for endpoints based on Network Load Balancers (see here for details).
Click on "Create endpoint Service", give it a name, Select "Gateway" as type and then select the newly created load balancer:
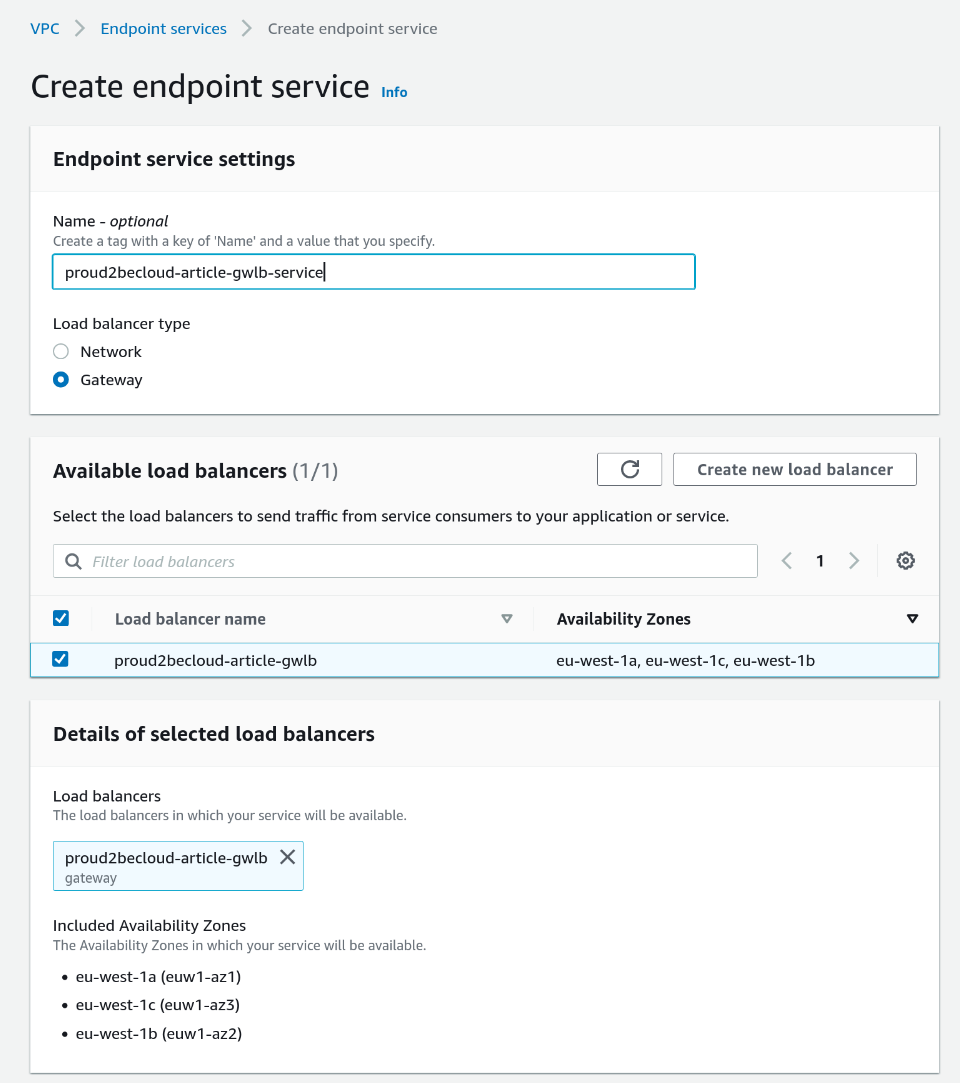
Take note of the service name, you will need it when creating a new endpoint:
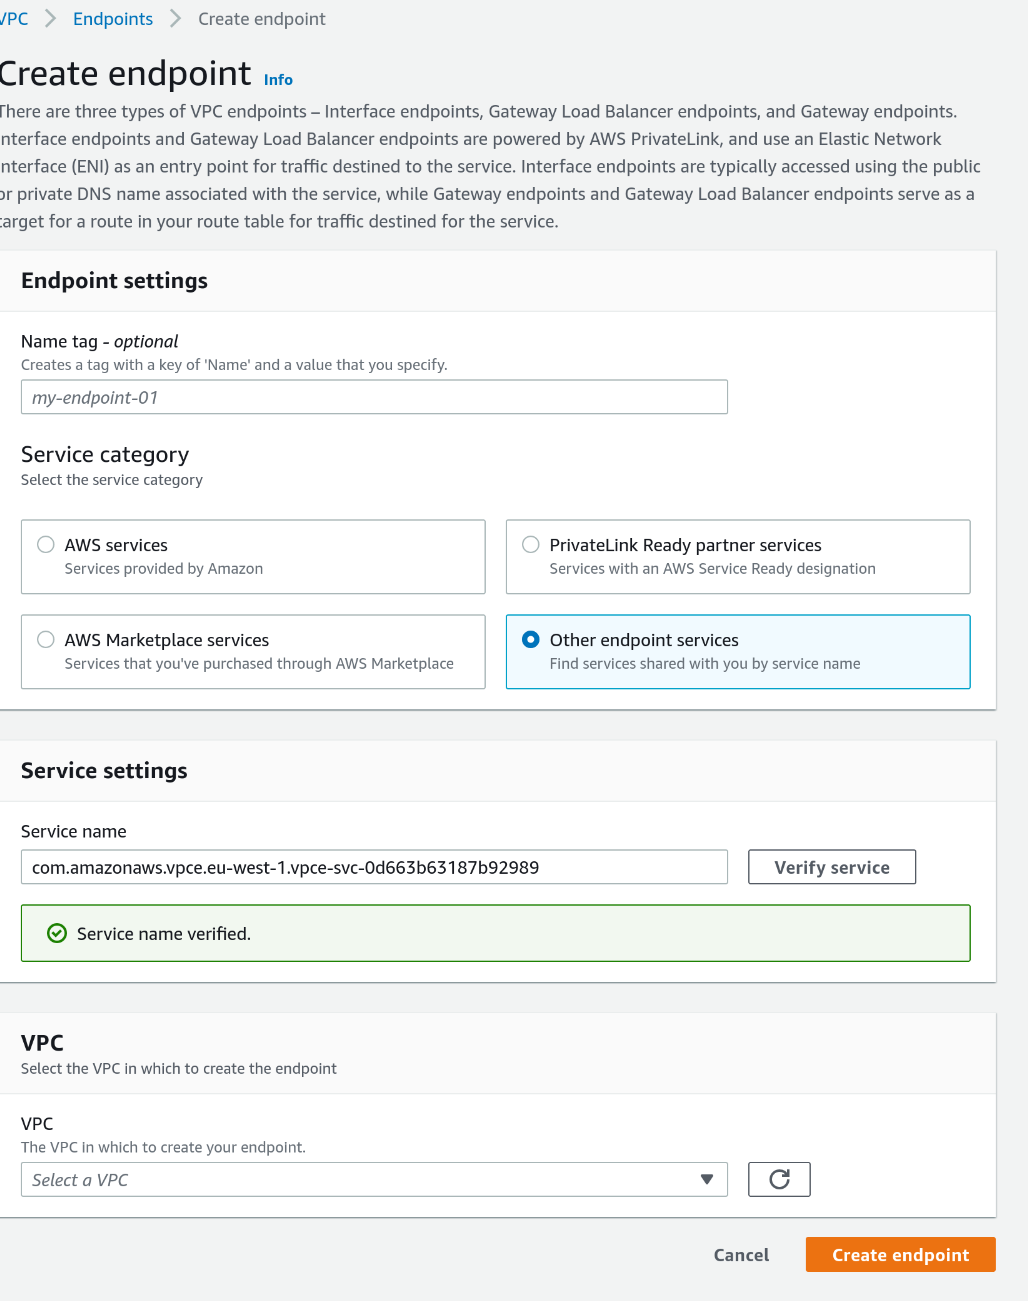
Click on "Endpoints", "Create Endpoint", select "Other endpoint services", paste the service name we noted before and click on "Verify Service".
Select the VPC and a subnet to place the endpoint (we use a subnet that is reachable from the Transit Gateway)
Repeat this step for the other subnets, and Don't forget to accept the connections!
When our endpoint is ready, we can modify our route table to use it and direct our traffic to the gateway load balancer. Select "Gateway Load Balancer Endpoint" as the target:

Now our network configuration is complete! We only need to create the autoscaling group. Since this is a basic task, we will not cover it in this article.
Remember to create and include an instance profile in your launch template with this policy attached:
{
    "Sid": "Allow Source-Dest check modification",
    "Effect": "Allow",
    "Action": "ec2:ModifyInstanceAttribute",
    "Resource": "*"
}
Note: this is a sample policy for our article. Remember that you may need to restrict its scope for security reasons.
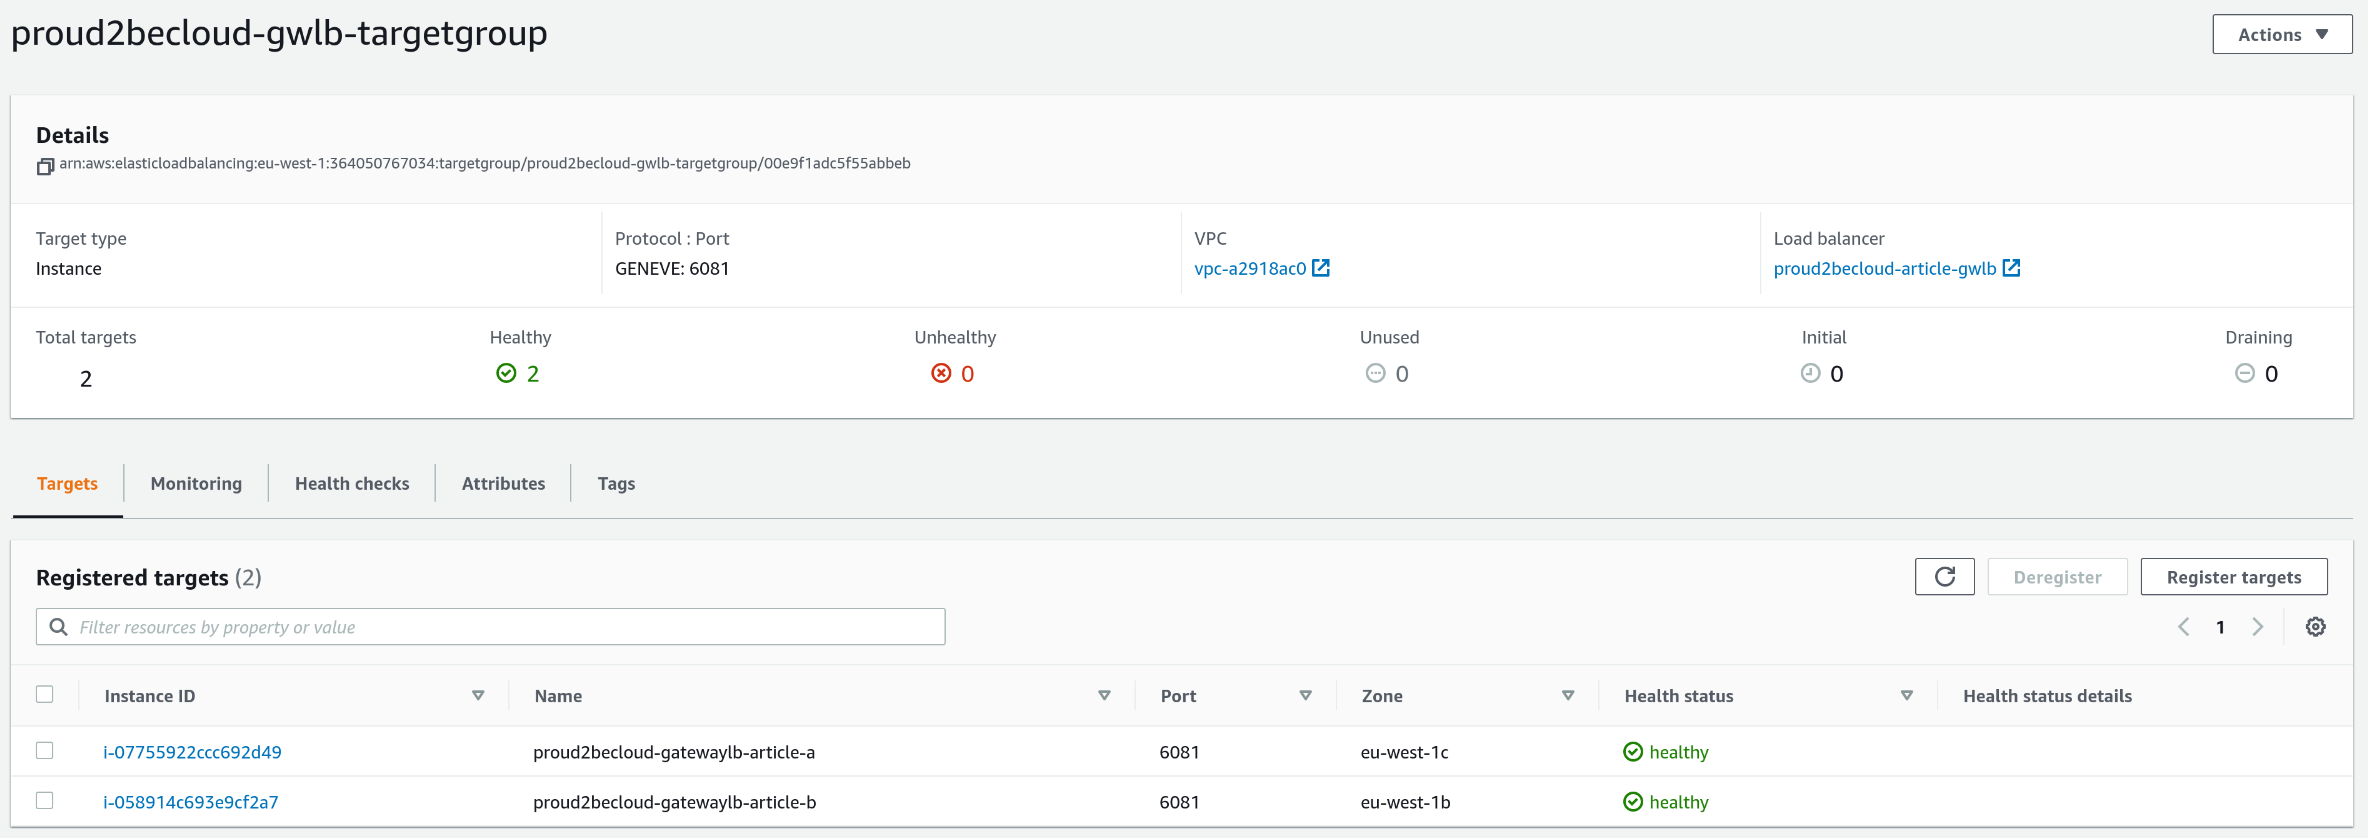
Once you finish defining the autoscaling, you should see your instances running in the target group!
If you log into an instance, you will see that:

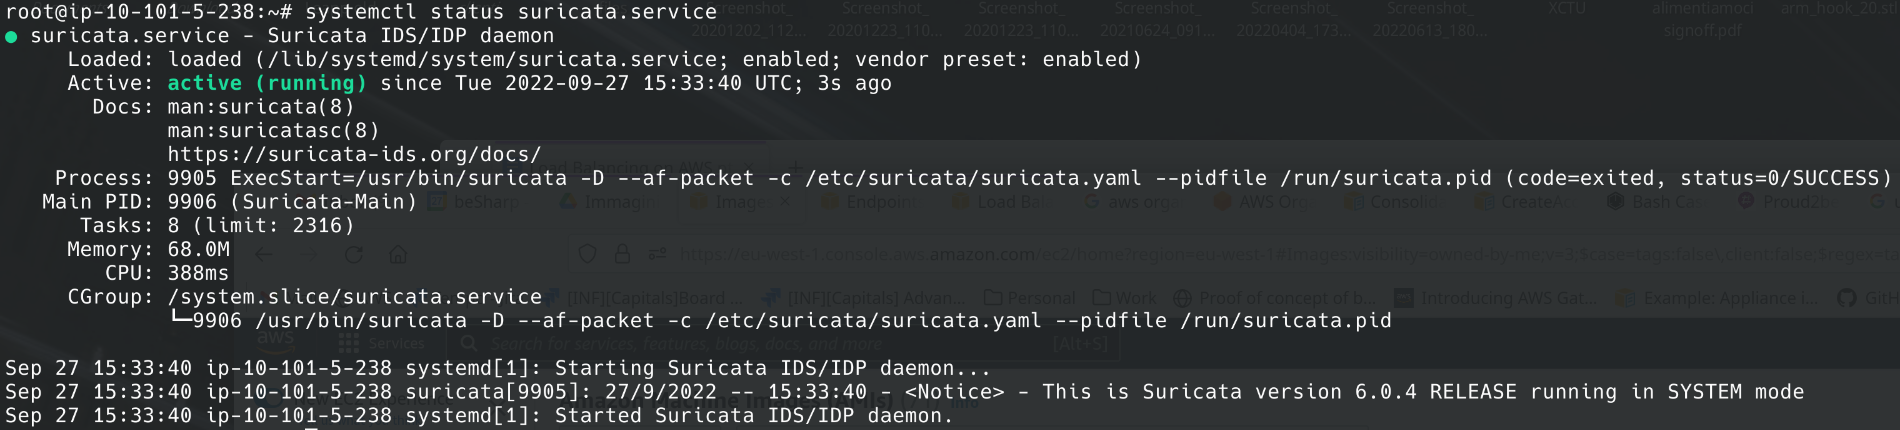
2. The service is up and running.
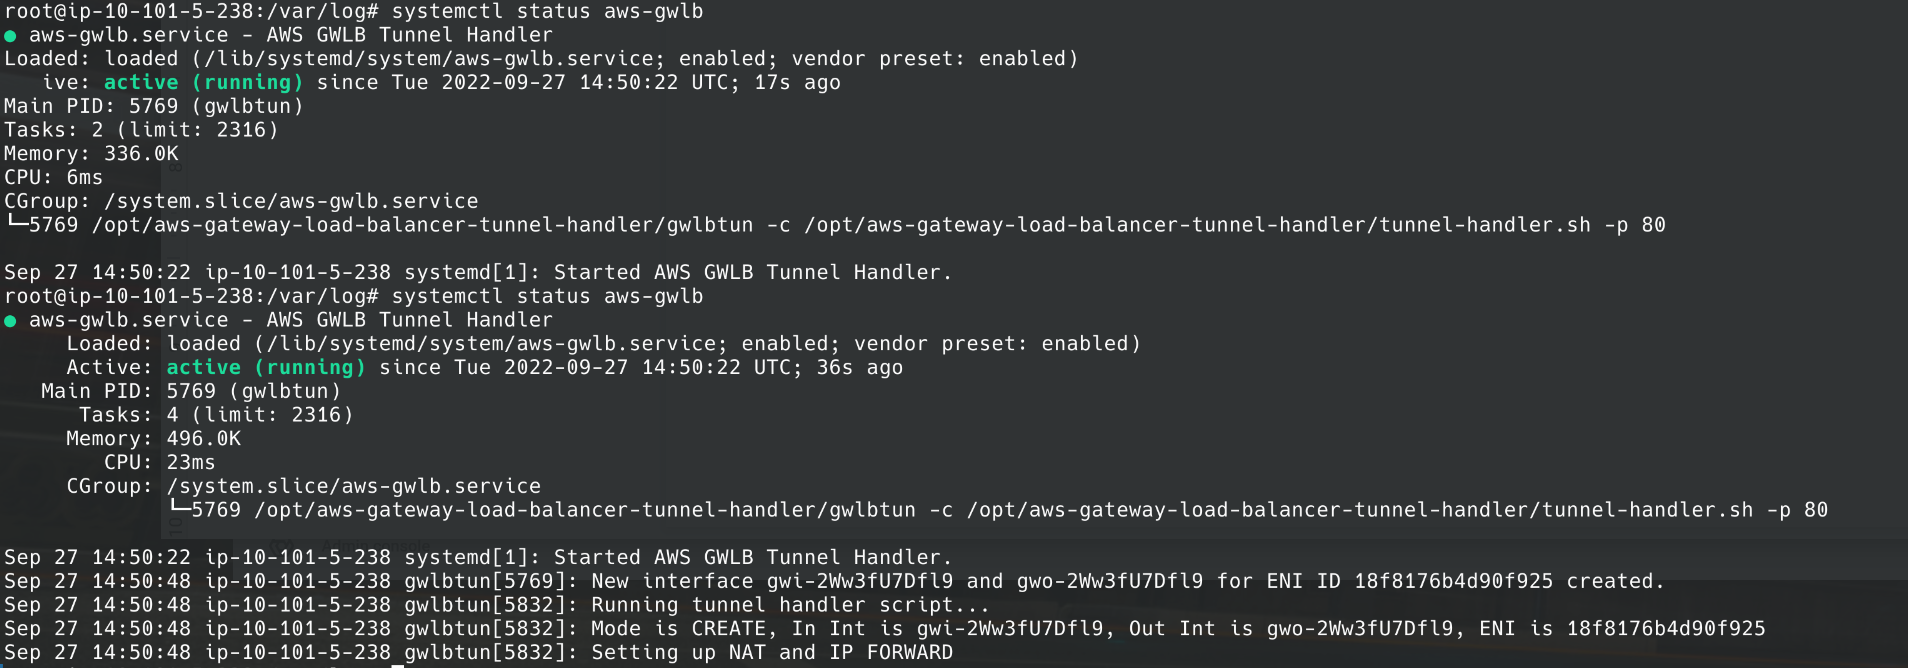
3. Gwlbtun created two new network interfaces (gwi-* and gwo-*).
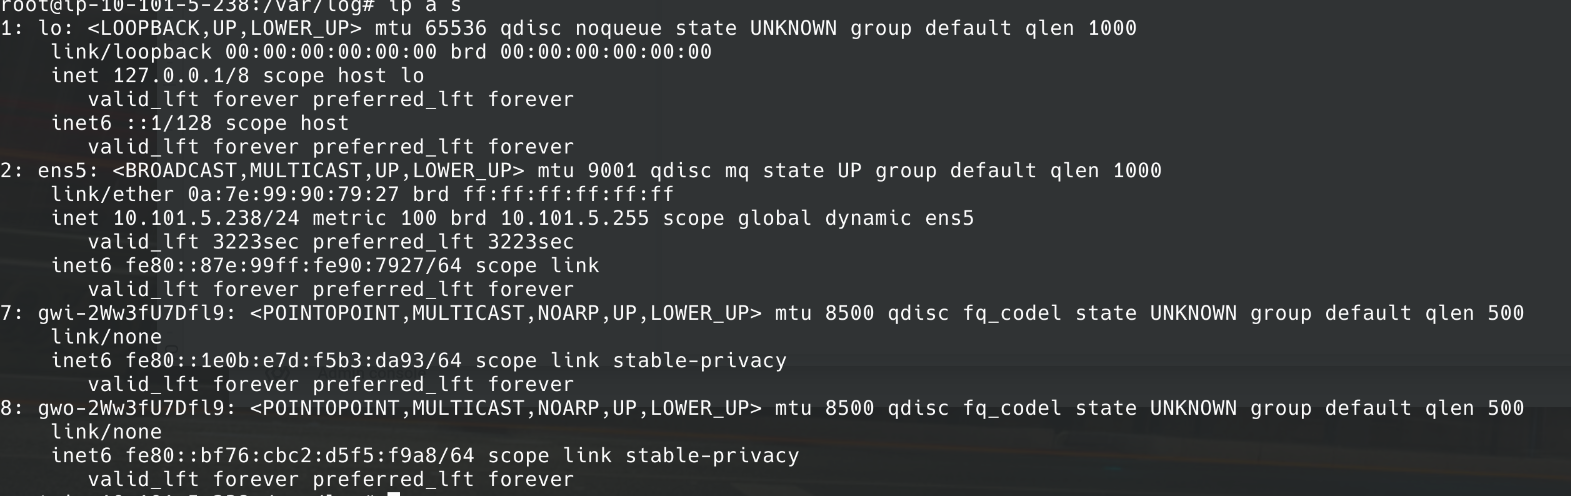
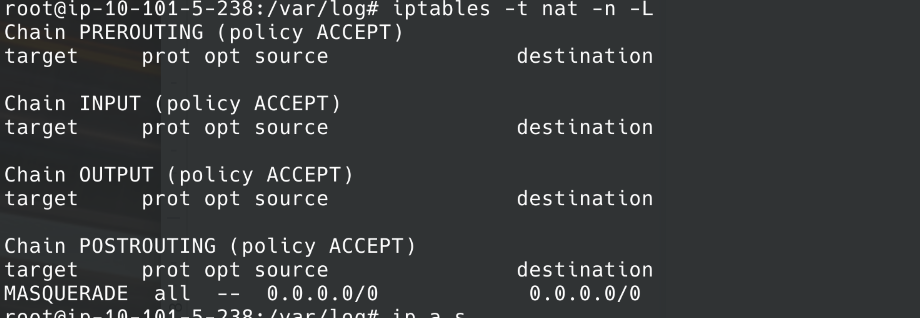
4. Our firewall rules are present.
5. Last but not least, Suricata will record network events.
You can install a squid proxy server on our template and use it as a transparent proxy to forward all logs to CloudWatch log for security investigation and auditing.
Hint: in /etc/squid/squid.conf you will need to enable "transparent mode", SSL bumping and insert the right NAT rules with iptables.
You can filter outgoing traffic if you refine the firewall script (or use a graphical interface like EasyWall.
With a Gateway Load Balancer, you can customize how outgoing traffic from your VPC is handled, gaining control and visibility using a highly available solution.
Now you should know what happens behind the scenes when you use a vendor appliance, Implementations may vary, but the key concepts and technology are in common.
Do you have other ideas or some additional unusual scenarios where a Gateway Load Balancer can help? Let us know in the comments!
Proud2beCloud is a blog by beSharp, an Italian APN Premier Consulting Partner expert in designing, implementing, and managing complex Cloud infrastructures and advanced services on AWS. Before being writers, we are Cloud Experts working daily with AWS services since 2007. We are hungry readers, innovative builders, and gem-seekers. On Proud2beCloud, we regularly share our best AWS pro tips, configuration insights, in-depth news, tips&tricks, how-tos, and many other resources. Take part in the discussion!