MongoDB is a document-based NoSQL database for seamless configuration and use. It is wide-spread across new development projects. In this article, we will see how creating a self-healing system for Mongo clusters on AWS prevents possible downtime.
How to create a MongoDB ReplicaSet with Self Healing using AWS services
19 April 2019 - 8 min. read


MongoDB allows for creating a cluster distributed in high reliability through ReplicaSets and Sharding:
- ReplicaSets are sets of identical nodes on which database-entered JSON documents are replicated.
- Sharding allows for writing each set of JSON documents (Collections) on a different server. This ensures better throughput in both reading and writing.
Sharding configuration is intolerant to failures. In fact, its Collections become inaccessible in the event of a machine down. To overcome this obstacle, we opt for a mixed configuration based on Sharding and Replication. Here, each sharding node is actually a replica set.
Each ReplicaSet is composed of a Master that takes care of writing and reading, and at least two Replicas that do not accept writing directly but are kept synchronized with the data in the Master and can only perform reading operations. Every two seconds, each node communicates its status to the others through a heartbeat system. In the case of master failure, the secondary nodes vote to elect the new Master.
However, for correct voting, more than 50% of the cluster nodes must participate in the vote.
Therefore, for deployment on AWS, it is advised to distribute EC2 equally on at least three Availability Zones (AZ). This is necessary if you want the ReplicaSet to remain functional, even in the occurrence of an AZ down.
A configuration with three nodes is often used for the set replication in databases that are small and not read intensive, or for databases with Sharding. In this configuration, if a node fails, two more are always available for voting. One of these will be promoted to master.
However, especially under heavy traffic, the failure of a node must be treated as an emergency and solved as soon as possible. Any further failure, in fact, would result in a service interruption.
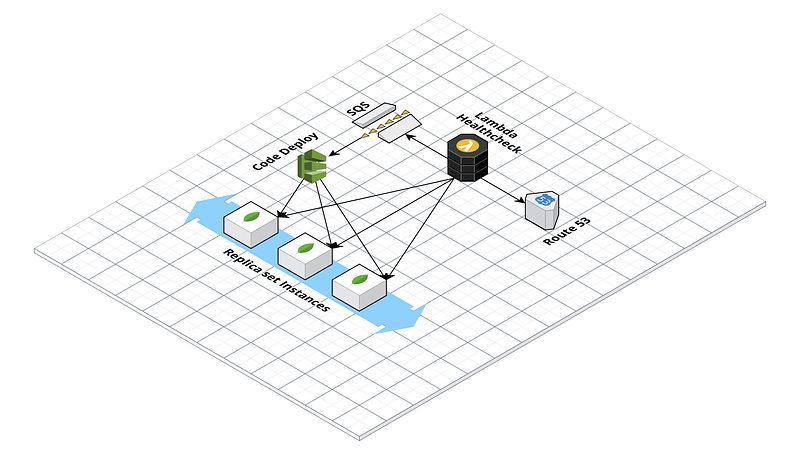
We have implemented a MongoDB self-healing system to automatically resolve this type of situation. It lets DB managers complete the post-mortem analysis of the failed MongoDB instance and automatically recreate an instance identical to the one no longer accessible. They can then reconfigure the replica set to use the new EC2 instead of the one that is corrupted.
AWS implementation tools for this solution are as follows:
- Autoscaling group: an AWS service to manage and scale groups of instances. One can define the instance type and the number of instances to be used. AWS will launch them, monitor their status, and terminate them if necessary, as well as launch new ones.
- Route 53: AWS DNS service
- Lambda Functions: Server-less functions launched on AWS as a response to a trigger or according to an AWS CloudWatch set the pace.
- SQS Queues: AWS-managed highly-reliable message queues.
- AWS CodeDeploy: AWS-managed service for arbitrary code deployment through a machine-installed agent that integrates with autoscaling groups. Deployment is performed when a new instance is started.
Creation of the ReplicaSet
To proceed with the creation of the ReplicaSet with self-healing, it is first of all necessary to create a basic AMI for the replication machines set with all the necessary packages installed: AWSCLI, Chrony, Ruby, and obviously MongoDB (master and client) in the desired version. It is also necessary to install the CodeDeploy agent.
In order to configure the replica set, create and install a keyfile on every cluster machine. Mongo will use it to authenticate the heartbeat connections. The file must contain alphanumeric characters generated in a pseudo-random way. It can be created with the command:
openssl rand -base64 756 > <path-to-keyfile>
chmod 400 <path-to-keyfile>
The keyfile is a minimal form of security and is acceptable only on a secure network (private subnet in VPC). However, for the production environment, using a x.509 certificate is preferable. The MongoDB configuration file will look similar to this:
storage:
  dbPath: /mnt/mongo/data
  journal:
    enabled: true
systemLog:
  destination: file
  logAppend: true
  path: <logs-path>
security:
  keyFile: <keyfile-path>
replication:
  replSetName: test-rs
net:
  port: 27017
  bindIpAll: true
The initial creation of the MongoDB cluster can be fully automated using CloudFormation. It can also be performed manually using the just-created AMI and a configuration script to run on the cluster’s individual machines.
First, one of the machines must be configured to be the master and initialize the ReplicaSet. Therefore, first start Mongo without the security and replication fields in the configuration file, then create an admin user with the command:
db.createUser({user: "<ADMIN_USER>", pwd: "<PWD>", roles:[{role: "root", db: "admin"}]});
Then, restart Mongo with the configuration file containing security and replication.
After having turned on the other machines, which will initially be replicas, it is necessary to create A names on a private Route53 hosted zone for all machines in the replica set. In VPC configurations, it is also necessary to select the enableDnsHostnames and enableDnsSupport options for activating the resolution of the R53 internal DNS.
Having done that, it is finally possible to connect in SSH to the master and activate the replica set through Mongo CLI with the command:
rs.initiate( {
   _id : "test-mongo-rs",
   members: [
      { _id: 0, host: "mongodb-1.test.it:27017" },
      { _id: 1, host: "mongodb-2.test.it:27017" },
      { _id: 2, host: "mongodb-3.test.it:27017" }
   ]
});
Now that the ReplicaSet is set up and working, let us focus on the self-healing.
Self Healing Setup
To configure the self-healing, first, register the machines to an autoscaling group with EC2-type health check. This needs to feature a fixed number of machines (Max: 3, Min: 3, and Desired: 3). This way, in case of a machine failure, AWS will create a new instance from an AMI defined in the launch template of the autoscaling group. Next is the creation of a Lambda function that acts as a “health check” for the ReplicaSet machines. In our case, we chose to create a lambda in python with Pymongo installed as a Lambda Layer. The lambda function connects to the ReplicaSet via Pymongo. It monitors the status of all nodes via the replSetGetStatus command, offering an exploded view of the ReplicaSet status:
import boto3
from pymongo import MongoClient
sqs = boto3.client('sqs')
mongoserver_uri = os.environ['MONGO_URI']
hostzone = os.environ['ZONE_ID']
mongo_connection = MongoClient(mongoserver_uri)
dns_aws = boto3.client('route53')
ec2 = boto3.resource('ec2')
rs_status = mongo_connection.admin.command('replSetGetStatus')
The “health” value of all non-functioning nodes will be: 0. To avoid false positives, we have configured the code to repeat the check several times with a one-minute interval. If the node does not return healthy in this interval, then the lambda writes a message on an SQS queue containing the DNS name of the failed machine and a timestamp.
Once complete, the code will de-register the failed machine from the autoscaling group using boto3, if it has not already been terminated:
autoscaling = boto3.client('autoscaling')
response = autoscaling.detach_instances(
    InstanceIds=[
        'string',
    ],
    AutoScalingGroupName='mongo-autoscaling',
    ShouldDecrementDesiredCapacity=False
)
The lambda is configured to avoid multiple executions. By sending the message on SQS, the instance is deregistered only if the SQS queue is empty (ApproximateNumberOfMessages = 0).
The lambda preparation is followed by the last step: the CodeDeploy configuration.
This has the task of configuring the new instances when the autoscaling group is turned on. Let us start by creating a new application in the CodeDeploy dashboard and a new deployment group targeting the newly created autoscaling group. CodeDeploy runs a series of user-configurable script operations on the machine. It is defined in a file called appspec.yml that must be saved in an S3 bucket together with the scripts and files to be transferred and/or executed on the machine.
The structure is as follows:
version: 0.0
os: linux
files:
  - source: /content
    destination: /home/ubuntu
hooks:
  ApplicationStop:
    - location: scripts/applicationstop.sh
      timeout: 300
      runas: root
  BeforeInstall:
    - location: scripts/beforeinstall.sh
      timeout: 300
      runas: root
  AfterInstall:
    - location: scripts/afterinstall.sh
      timeout: 300
      runas: root
  ApplicationStart:
    - location: scripts/applicationstart.sh
      timeout: 300
      runas: root
  ValidateService:
    - location: scripts/validateservice.sh
      timeout: 300
      runas: root
The folder structure to upload on s3 for CodeDeploy input is as follows:
content/
    mongod.conf
    mongo-keyfile
scripts/
    afterinstall.sh
    applicationstart.sh
    applicationstop.sh
    beforeinstall.sh
    validateservice.sh
In our case, the content folder contains the keyhole and the Mongo configuration file, whereas the scripts folder contains the bash scripts that deal with configuring the new instance. In particular, the scripts must read the message containing the DNS name of the failed machine from the SQS queue; configure Mongo on the recently turned-on machine through MongoDB CLI; reconfigure the replica set to use the new node, and finally start the Mongo service.
The following chain of events is triggered as soon as an instance fails (or the Mongo process becomes unresponsive):
- The health check lambda detects the node as unhealthy. It detaches the machine from the autoscaling group and writes a message on an SQS queue containing the failed node’s DNS name.
- The autoscaling group reacts to the absence of a machine by starting a new ec2.
- CodeDeploy executes the configuration scripts saved on S3. These configure the new machine so that they take the place of the failed one.
At this point, MongoDB starts replicating the data on the new machine. However, for large databases, this operation can take several hours. It is advised to configure MongoDB in order to avoid this problem, i.e., by saving data on a specific EBS. During the creation of the new instance, dismount the EBS from the failed instance and mount it on the newly created instance.
Once all configurations are complete, our replica set in high reliability and with automatic self-healing is ready!
Would you like to share your observations, doubts, or ideas with us? Would you like some help in creating a configuration like this? … then our team looks forward to discussing this with you: contact us!