
VPC Lattice: yet another connectivity option or a game-changer?
12 April 2024 - 4 min. read
Damiano Giorgi
DevOps Engineer


More and more applications, both mobile and web, rely on managed services such as Amazon Cognito for user authentication and authorization. Cognito allows you to rapidly develop secure applications adhering to recognized security standards for authentication and authorization of end-users.
Leveraging a fully managed service allows developers to stop worrying about the authentication flow and the user pool management, leaving them free to focus on what matters: the business logic of their products.
However quite often we would like to federate with our application third-party service or another microservice.
While Cognito is mainly used for user authentication flows, it can also be used to create a machine to machine authentication system.
In this article we'll describe how Cognito can be used to authenticate a client system that needs access to a set of sensitive APIs exposed by a service.
However before deep diving into the description of the solution, it could be useful to describe the services involved.
When you need to implement an authorization and authentication system on AWS, Amazon Cognito is your best choice.
Amazon Cognito lets you add user sign-up, sign-in, and access control to your web and mobile apps quickly and easily, it scales to millions of users and supports sign-in with social identity providers, such as Facebook, Google, and Amazon, and enterprise identity providers via SAML 2.0.
Furthermore Cognito also supports multi-factor authentication and encryption of data-at-rest and in-transit. Amazon Cognito is HIPAA eligible and PCI DSS, SOC, ISO/IEC 27001, ISO/IEC 27017, ISO/IEC 27018, and ISO 9001 compliant.
Let’s move on to describe the main concepts of Cognito.
Users are managed through two types of pools, which are at the heart of Amazon Cognito’s operation: User Pools and Identity Pools.
A user pool is essentially a user directory that allows you to securely store your users’ profile attributes. This is a convenient way to completely off-load user profile management, security, and availability. Among the operations which can be off-loaded, there is certainly the secure storage of user data, the verification of telephone numbers and/or e-mail addresses, the management of the login system APIs, and the flow of registration, login, logout, and password reset.
In addition, to using the Amazon Cognito-specific user APIs to authenticate users, Amazon Cognito user pools also support the OAuth 2.0 authentication protocol to authenticate users or applications.
User pools are a fundamental component of any authentication system based on Amazon Cognito, and we will leverage this component to build our machine to machine authentication system.
We are not going to use Identity Pools for this specific scenario, but it could be useful to describe them briefly.
Identity pools are used by Cognito Identity to keep the application’s federated identities organized. An identity pool associates federated identities from external identity providers with a unique specific user identifier. Identity pools do not store user profiles, but only their unique ids, which are generated and managed by Cognito. Cognito Identity pools assign users a set of temporary IAM credentials with limited privileges. Users or client applications can use those credentials to access AWS resources. Authorizations rules for each user are controlled through customizable AWS IAM roles and policies. It is also possible to define rules to match Users with the desired role.
Now that we’ve defined all the fundamental concepts we can move on to the central part of our article.
Let's start by defining the authentication flow that we will configure in the next steps.
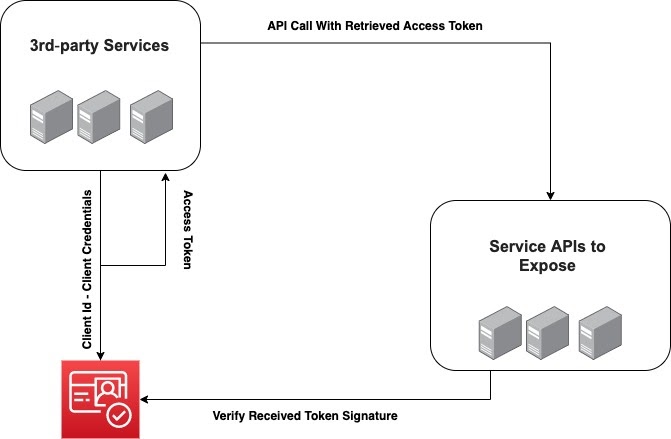
As described in the OAuth 2.0 specifications, we can authenticate a client that presents a valid Client Id and Client Secret to our Identity Provider.
As you can see from the image above, a generic client can call AWS Cognito APIs with the previously shared Client Id and Client Secret. If the two parameters are valid, AWS Cognito returns an Access Token. Now the application can call your services passing the retrieved Token.
What your services have to do now, is to validate it as described by the OAuth 2.0 specification. In this step you need to:
With the authentication flow in mind, let's go on to configure it inside your AWS Account.
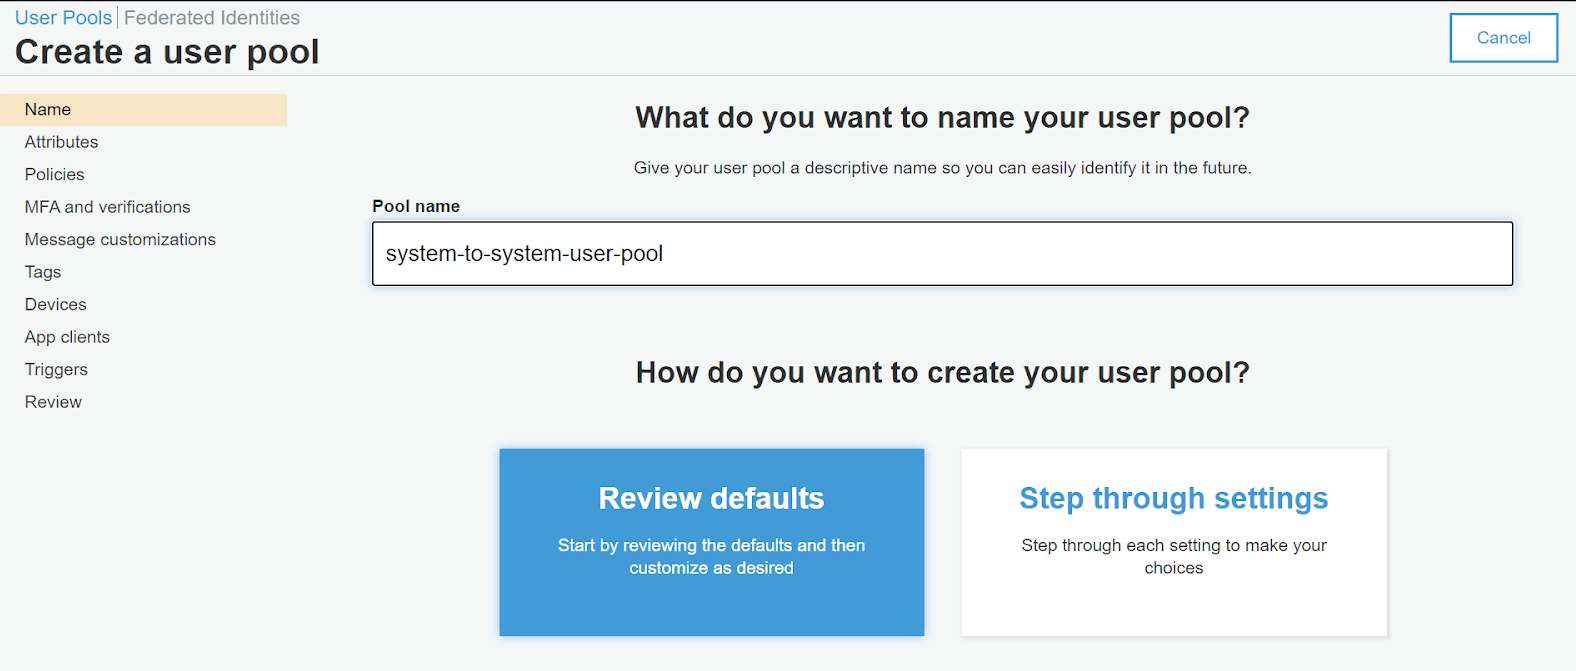
Now that you are aware of the different Amazon Cognito components, we can start with the project. First of all, a basic user group needs to be created from the AWS console. To do so it’s possible to choose an explicative name and keep all the default settings by clicking the “Review defaults” button.
At this point we can start exploring the numerous options provided by our new user pool, tweaking the ones needed for our project.
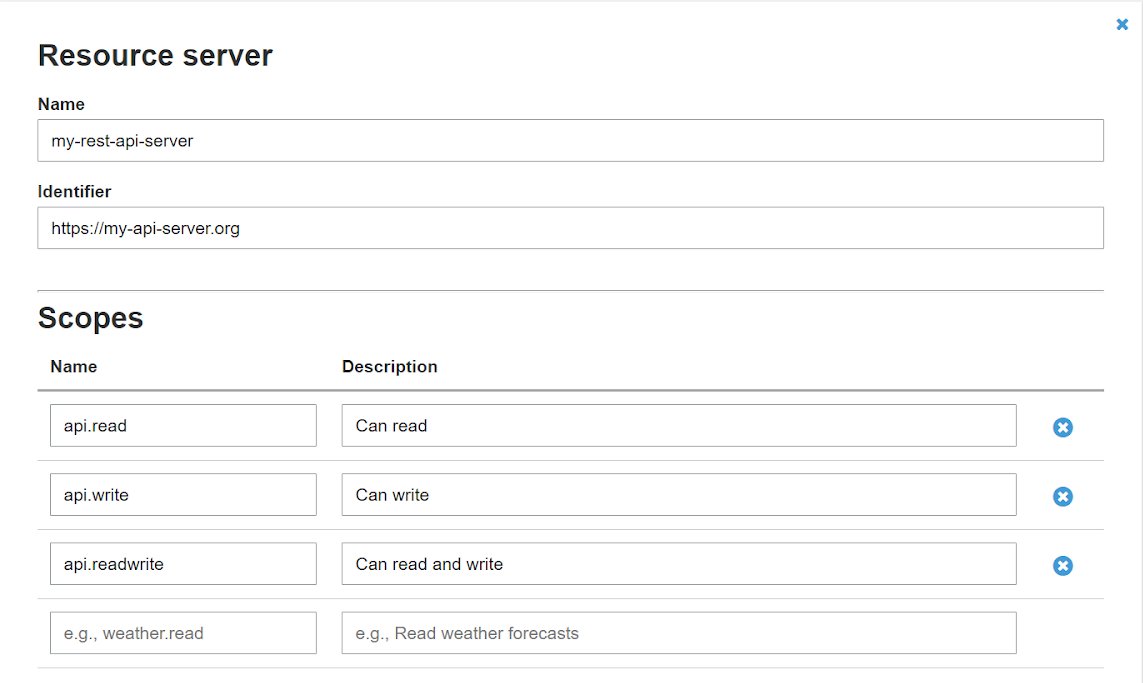
The server that will handle the authorized requests can be specified in the resource server page of the Cognito console
Here you’ll be able to determine the unique URL of the server exposing the APIs you need to protect. Moreover, a set of scopes can be listed in this page to discriminate, for example, various levels of access to your service.
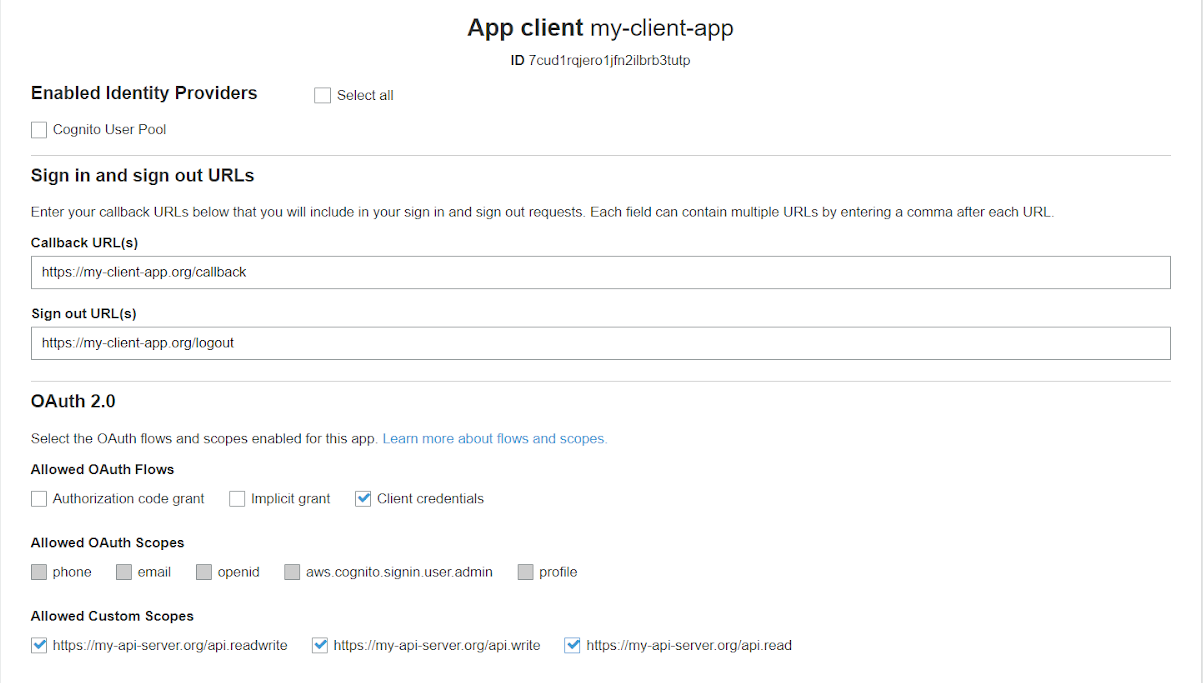
Now that the resource server has been configured, we can follow up with the settings of the app clients.
In this page it’s possible to define a new client, for example, a new web-app that needs to consume the set of APIs you want to protect.
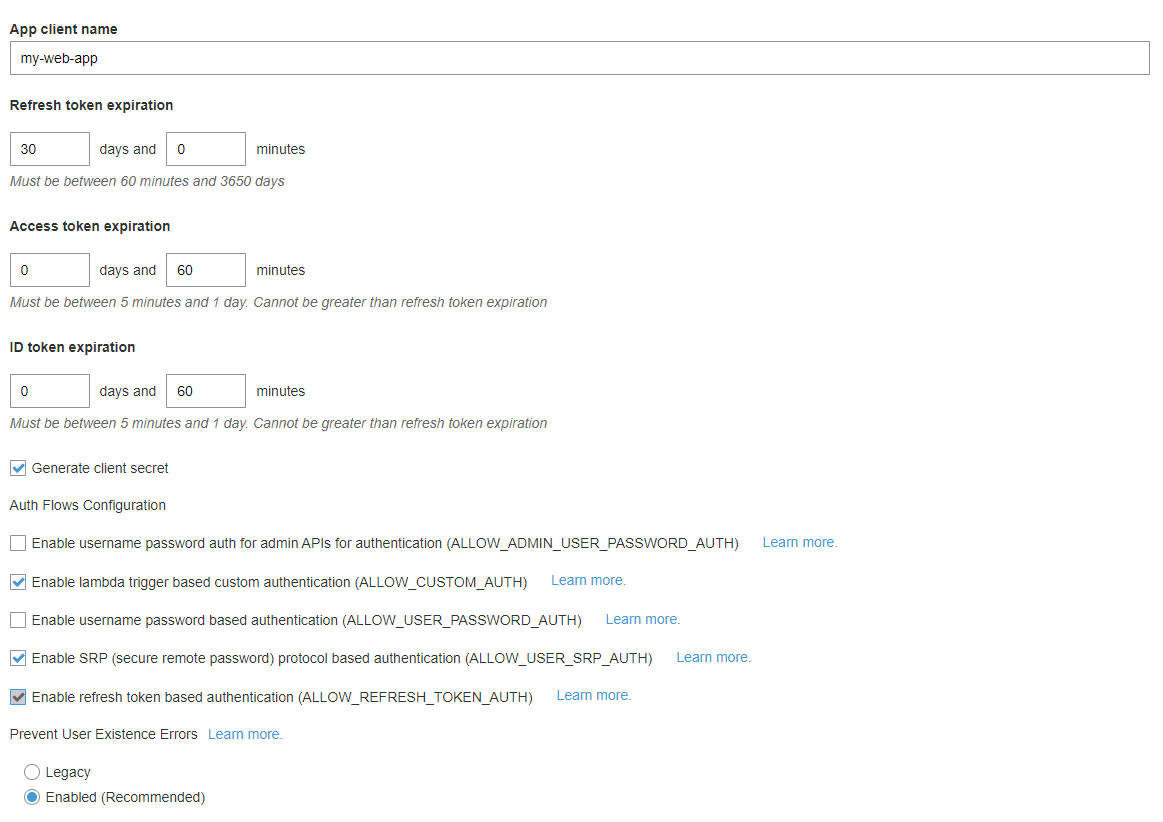
Here you can specify the name of the new client and the expiration of the security tokens used in the authorization process. Due to the client credentials grant type specifications, ID tokens and refresh tokens are not used, hence only the access token’s expiration is important.
When these details are submitted, Cognito will prompt us with an app client id and an app client secret. Although the client id is intended as a public identifier of apps, it’s important that you never share either the id or the secret for security reasons.
These two tokens need to be encrypted and stored by each of the registered applications to request access tokens to the Cognito user pool. They are essentially the username and password of the system-to-system authorization.
Your app is now successfully registered and it’s possible to edit the authorization options you want to enable for its users from the app client settings page.
In this form, in fact, you’ll be able to choose the client credentials OAuth flow as the single method allowed to request access tokens. From this page, you’re also able to define which scopes can be used by each app client, to get rid of the possibility to request APIs that are not meant to be called from a specific client.
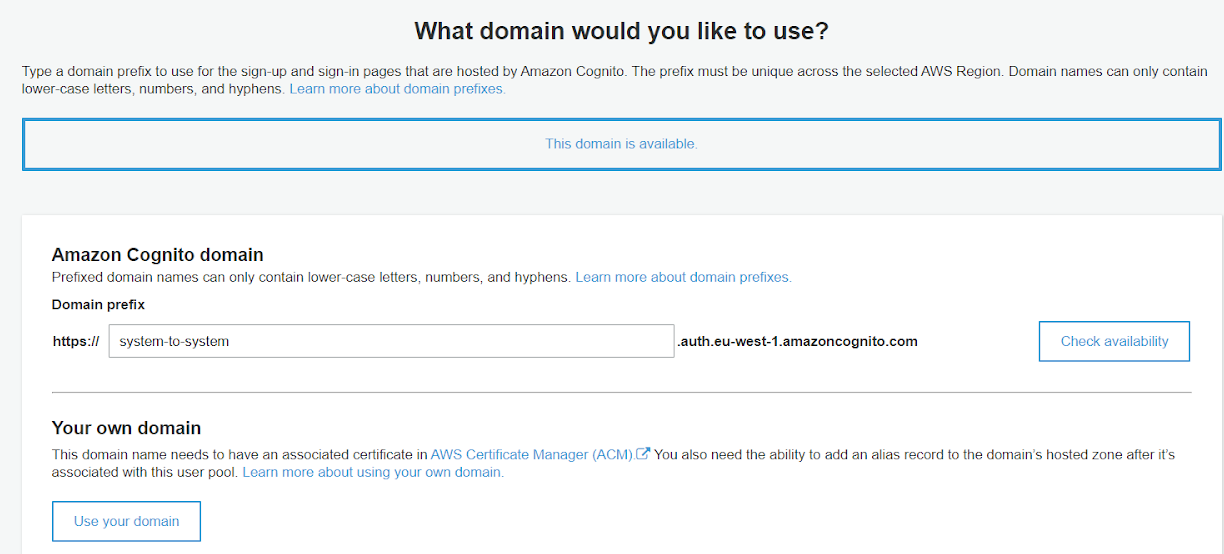
As a final step on the cognito console, a domain name needs to be chosen. In fact, on this page, we’ll choose (if available) where the applications will send the access token requests.
Cognito is now ready to prompt to you tons of access tokens!
import requests

TOKEN_ENDPOINT = 'https://system-to-system.auth.eu-west-1.amazoncognito.com/oauth2/token'

body = {
    'grant_type': 'client_credentials',
    'client_id': CLIENT_ID,
    'client_secret': CLIENT_SECRET,
    'scope': 'https://my-api-server.org/api.readwrite'
}

response = requests.post(TOKEN_ENDPOINT, data=body)
print(response.text)
As you can see from the snippet above, the retrieval of the access token is a fairly simple HTTP POST request that needs in its body few simple parameters seen before. The token endpoint is built from the newly created domain name.
The access token we just received is now ready to be shipped within an API call to the resource server. The latter, then, must be able to decode it and validate it against a set of public signature keys exposed by cognito.
import functools
import json
import jwt
import urllib.request
def is_valid_token(scope) -> bool:
    def wrapped(func):
        @functools.wraps(func)
        def wrapper(access_token):
            public_keys = get_well_known_jwk(REGION, USER_POOL_ID)
            kid = jwt.get_unverified_header(access_token)['kid']
            key = public_keys[kid]
            payload = jwt.decode(access_token, key=key, algorithms=['RS256'])
            if payload['client_id'] != CLIENT_ID:
                print('Wrong client_id')
                raise Exception('Wrong client id')
            if payload['scope'] != scope:
                print('Wrong scope')
                raise Exception('Wrong scope')
            return func(access_token)
        return wrapper
    return wrapped
def get_well_known_jwk(region: str, user_pool_id: str) -> dict:
    jwk_url = f"https://cognito-idp.{region}.amazonaws.com/{user_pool_id}/.well-known/jwks.json"
    with urllib.request.urlopen(jwk_url) as url:
        jwks = json.loads(url.read().decode())
    public_keys = {}
    for jwk in jwks['keys']:
        kid = jwk['kid']
        public_keys[kid] = jwt.algorithms.RSAAlgorithm.from_jwk(json.dumps(jwk))
    return public_keys
@is_valid_token(scope = 'https://my-api-server.org/api.write')
def api(access_token):
    resp = {
        "status_code": 200,
        "body": "This is your body."
    }
    print(json.dumps(resp))
You can now test the solution and authenticate other services in your application.
That’s all for today! In this article, we explained how to build a secure, reliable, and fully managed machine to machine authentication system leveraging Amazon Cognito and Cognito User Pools.
Feel free to contact us and comment below to ask questions or just to add your thoughts on the subject.
Stay tuned for the next article and see you in 14 days on #Proud2beCloud!